Tag Archives: #000000

Mastery14

Creating and using a Python module

A module is a file containing Python definitions and statements. The file name is the module name with the suffix “.py”

Example:

  • Create “hello.py” then write the following function:
def helloworld():
   print "hello"

import hello
hello.helloworld()
>>>'hello'

AWESOME PAGE

14 1014

#mastery25 #TC1017

C++ string is an object of the class string, which is defined in the header file and which is in the standard namespace. The string class has several constructors that may be called (explicitly or implicitly) to create a string object.

Examples

 string s1;               // Default constructor – creates an empty or null C++ string of length 0, equal to “”

  string s2(“hello”);      // Explicit constructor call to initialize new object with C string

  string s3 = “hello”;     // Implicit constructor call to initialize new object with C string

  string s4(s2);           // Explicit constructor call to initialize new object with C++ string

  string s5 = s2;          // Implicit constructor call to initialize new object with C++ string

Representation in Memory

Here is another example of declaring a C++ string:

 string name = “Karen”;

C++ string

name is a string object with several data members. The data member p is a pointer to (contains the address of) the first character in a dynamically-allocated array of characters. The data member length contains the length of the string. The data member capacity contains the number of valid characters that may currently be stored in the array.

A “null string” is a string with a length of 0:

Null C string

The length of a null string is 0.


25 1017

#MASTERY13 #TC1017

13 1017

Importing and using C++ libraries

Estuve investiganco acerca de esto y pues casi no entendi muy bien ,yo trabaje el semestre pasado con visual studio, y se me hizo un poco más practico poder entenderle ahí, entonces pues para añadir una librería lo primero que debemos hacer es instalar esa librería. En Ubuntu debería ser un simple apt-get install, pero tal vez queramos tener una versión más actual o no encontremos nuestra librería en repositorios, por lo que tendremos que compilarla haciendo uso del make que nos traiga su paquete. Una vez instalada, tal vez debamos añadir algunos parámetros en el compilador. Para ello vamos a Run>Set Proyect Configuration>Customize…>C++ Compiler>Command Line>Aditional Options y añadimos ahí las opciones. Por ejemplo, para la librería OpenCV tendríamos que añadir: `pkg-config --cflags opencv` `pkg-config --libs opencv` esto mismo lo podemos hacer buscando las librerías y añadiéndolas en Run>Set Proyect Configuration>Customize…>Linker>Libraries. Una vez ahí debemos darle a “Add library file” o “Add library” y buscar las librerías estandar dinámicas (.a) o estáticas (.so) que suelen estar en el directorio /usr, /usr/lib, /usr/share, etc. una vezh echo todo esto, puede que tengamos problemas con el autocompletado, tambien puede que funcione todo perfectamente. En tal caso tendríamos 2 opciones añadir la dirección de los archivos .h (los de los includes) en: Tools>Options>Code Assintance>C++ Compiler>Adde la segunda opción es que el problema sea que Netbeans nos reconoce los ficheros de cabeceras, pero por problemas en el preprocesado del proyecto se “líe” un poco con los . Por ejemplo, si nuestro problema es que en nuestro archivo cabecera nos aparece, por ejemplo, algo así (y en este sitio es donde nos da el error):#ifndef __MMX__# error “MMX instruction set not enabled”


#Mastery 28 – Reading and writing of files in C++

Manejo de archivos en c++

Para manejar archivos dentro de c++ tenemos que utilizar el archivo de cabecera fstream.h. Este define las clases ifstream, ostream y fstream para poder realizar operaciones de lectura, escritura y lectura/escritura en archivos respectivamente. Para trabajar con archivos se tienen que crear objetos de éstas clases, según las operaciones que deseamos efectuar. Iniciaremos con las operaciones de escritura, para esto tenemos que declarar un objeto de la clase ofstream, después utilizaremos la función miembro open para abrir el archivo, escribimos en el archivo los datos que sean necesarios utilizando el operador de inserción y por último cerramos el archivo por medio de la función miembro close, como podemos ver en el siguiente ejemplo:

int main()
{
    
ofstream archivo;  

    archivo.open();

    archivo endl;
    
archivo endl;
    
archivo endl;

    archivo.close();
    return 
0;

En el programa se ha creado un objeto de la clase ofstream llamado archivo, posteriormente se utiliza la función miembro open para abrir el arcivo especificado en la cadena de texto que se encuentra dentro del paréntesis de la función. Podemos invocar a la función constructora de clase de tal manera que el archivo también se puede abrir utilizando la siguiente instrucción:


Al utilizar la función constructora no es necesario utilizar la función miembro open. De la misma forma que se utilizan manipuladores de salida para modificar la presentación en pantalla de los datos del programa,es posible utilizar éstos manipuladores al escribir datos en un archivo como lo demuestra el programa archiv02.cpp, observe que se utiliza un constructor para crear y abrir el archivo llamado Datos.txt:

int main()
{
    
ofstream archivo();  int numero;
    
    
cout endl;
    
cin >> numero;
    
archivo numero endl;
    
    
archivo resetiosflags(ios::dec);
    
archivo setiosflags(ios::oct);
    
archivo numero endl;
    
    
archivo resetiosflags(ios::oct);
    
archivo setiosflags(ios::hex);
    
archivo numero endl;
    
archivo setiosflags(ios::uppercase|ios::showbase);
    
archivo 
numero endl;
    
    
archivo resetiosflags(ios::uppercase|ios::showbase);
    
archivo resetiosflags(ios::hex);
    
archivo setiosflags(ios::showpos|ios::showpoint|ios::fixed);
    
archivo numero endl;
    
    
archivo resetiosflags(ios::showpos|ios::showpoint|ios::fixed);
    
archivo numero endl;
    
    
archivo.close();

    return 0;


Operaciones de lectura de archivos 
Para abrir un archivo y realizar operaciones de lectura se crea un objeto de la clase ifstream y se procede prácticamente de la misma forma que lo expuesto en el apartado anterior. Después de abrir el archivo se puede leer su contenido utilizando las funciones miembro de la clase ifstream o bién el operador de extracción. Cuando se lee un archivo, por lo general se empieza al principio del mismo y se leerá su contenido hasta que se encuentre el final del archivo. Para determinar si se ha llegado al final del archivo se puede utilizar la función miembro eof como condición de un bucle while. Además se puede utilizar la función miembro fail para detectar un error al abrir el archivo, esto se demuestra en el siguiente programa, archiv03.cpp:

int main()
{
    
ifstream archivo(ios::noreplace);
    
char linea[128];
    
long contador 0L;

    if(archivo.fail())
    
cerr endl;
    else
    while(!
archivo.eof())
    {
        
archivo.getline(lineasizeof(linea));
        
cout linea endl;
        if((++
contador 24)==0)
        {
            
cout ;
            
cin.get();
        }
    }
    
archivo.close();
    return 
0;

El programa crea un objeto de la clase ifstream para abrir el archivo llamado Pruebas.txt utilizando el constructor de clase y especificando la bandera ios::noreplace que evita que el archivo sea sobreescrito. Si por algún motivo ocurre un error al abrir el archivo se genera el mensaje de error especificado en la línea 16. En ausencia de errores el programa entra en un bucle while el cual está evaluado por efecto de la función miembro eof( ) de tal manera que el bucle se ejecuta hasta encontrar el final del archivo. Utlizando la función miembro getline( ) se obtiene una línea de texto y se exhibe en pantalla, línea 21, luego utilizamos una instrucción condicional if con el operador de módulo (%) para determinar si se han leído 24 líneas de texto. Cada vez que el contador de líneas dividido entre 24 dé como resultado un resíduo de cero el programa se detiene permitiendo leer las 24 líneas de texto previas. Para continuar se debe presionar la tecla enter y entonces el programa leerá y mostrará en pantalla las siguientes 24 líneas de texto, líneas 22 a la 26.


Referencias:

http://www.programacionenc.net/index.php?option=com_content&view=article&id=69:manejo-de-archivos-en-c&catid=37:programacion-cc&Itemid=55

1017 28

Mastery 28

Reading and writing of files in C++

Opening a File:

A file must be opened before you can read from it or write to it. Either the ofstream or fstreamobject may be used to open a file for writing and ifstream object is used to open a file for reading purpose only.

Following is the standard syntax for open() function, which is a member of fstream, ifstream, and ofstream objects.

Here, the first argument specifies the name and location of the file to be opened and the second argument of the open() member function defines the mode in which the file should be opened.

Mode Flag Description
ios::app Append mode. All output to that file to be appended to the end.
ios::ate Open a file for output and move the read/write control to the end of the file.
ios::in Open a file for reading.
ios::out Open a file for writing.
ios::trunc If the file already exists, its contents will be truncated before opening the file.

You can combine two or more of these values by ORing them together. For example if you want to open a file in write mode and want to truncate it in case it already exists, following will be the syntax:

Similar way, you can open a file for reading and writing purpose as follows:

Closing a File

When a C++ program terminates it automatically closes flushes all the streams, release all the allocated memory and close all the opened files. But it is always a good practice that a programmer should close all the opened files before program termination.

Following is the standard syntax for close() function, which is a member of fstream, ifstream, and ofstream objects.

Writing to a File:

While doing C++ programming, you write information to a file from your program using the stream insertion operator (ofstream or fstream object instead of the cout object.

Reading from a File:

You read information from a file into your program using the stream extraction operator (>>) just as you use that operator to input information from the keyboard. The only difference is that you use an ifstream or fstream object instead of the cin object.

Read & Write Example:

Following is the C++ program which opens a file in reading and writing mode. After writing information inputted by the user to a file named afile.dat, the program reads information from the file and outputs it onto the screen:

When the above code is compiled and executed, it produces the following sample input and output:

Above examples make use of additional functions from cin object, like getline() function to read the line from outside and ignore() function to ignore the extra characters left by previous read statement.

Credits:

http://www.tutorialspoint.com/cplusplus/cpp_files_streams.htm

1017 28

Mastery 26

Creation and use of matrixes in C++ (multi – dimensional arrays)

Two-Dimensional Arrays:

The simplest form of the multidimensional array is the two-dimensional array. A two-dimensional array is, in essence, a list of one-dimensional arrays. To declare a two-dimensional integer array of size x,y, you would write something as follows:

Where type can be any valid C++ data type and arrayName will be a valid C++ identifier.

A two-dimensional array can be think as a table, which will have x number of rows and y number of columns. A 2-dimensional array a, which contains three rows and four columns can be shown as below:

Mastery 26

Thus, every element in array a is identified by an element name of the form a[ i ][ j ], where a is the name of the array, and i and j are the subscripts that uniquely identify each element in a.

Initializing Two-Dimensional Arrays:

Multidimensioned arrays may be initialized by specifying bracketed values for each row. Following is an array with 3 rows and each row have 4 columns.

The nested braces, which indicate the intended row, are optional. The following initialization is equivalent to previous example:

Accessing Two-Dimensional Array Elements:

An element in 2-dimensional array is accessed by using the subscripts, i.e., row index and column index of the array. For example:

The above statement will take 4th element from the 3rd row of the array. You can verify it in the above digram.

When the above code is compiled and executed, it produces the following result:

As explained above, you can have arrays with any number of dimensions, although it is likely that most of the arrays you create will be of one or two dimensions.

Credits:

http://www.tutorialspoint.com/cplusplus/cpp_multi_dimensional_arrays.htm

1017 26

Mastery 25

Creation and use of strings in C++

C++ provides following two types of string representations:

  • The C-style character string.

  • The string class type introduced with Standard C++.

The String Class in C++:

The standard C++ library provides a string class type that supports all the operations mentioned above, additionally much more functionality. We will study this class in C++ Standard Library but for now let us check following example:

At this point, you may not understand this example because so far we have not discussed Classes and Objects. So can have a look and proceed until you have understanding on Object Oriented Concepts.

When the above code is compiled and executed, it produces result something as follows:

Credits:

http://www.tutorialspoint.com/cplusplus/cpp_strings.htm

1017 25

Mastery 24

Creation and use of arrays in C++

C++ provides a data structure, the array, which stores a fixed-size sequential collection of elements of the same type. An array is used to store a collection of data, but it is often more useful to think of an array as a collection of variables of the same type.

Instead of declaring individual variables, such as number0, number1, …, and number99, you declare one array variable such as numbers and use numbers[0], numbers[1], and …, numbers[99] to represent individual variables. A specific element in an array is accessed by an index.

All arrays consist of contiguous memory locations. The lowest address corresponds to the first element and the highest address to the last element.

Declaring Arrays:

To declare an array in C++, the programmer specifies the type of the elements and the number of elements required by an array as follows:

This is called a single-dimension array. The arraySize must be an integer constant greater than zero and type can be any valid C++ data type. For example, to declare a 10-element array called balance of type double, use this statement:

Initializing Arrays:

You can initialize C++ array elements either one by one or using a single statement as follows:

The number of values between braces { } can not be larger than the number of elements that we declare for the array between square brackets [ ]. Following is an example to assign a single element of the array:

If you omit the size of the array, an array just big enough to hold the initialization is created. Therefore, if you write:

You will create exactly the same array as you did in the previous example.

The above statement assigns element number 5th in the array a value of 50.0. Array with 4th index will be 5th, i.e., last element because all arrays have 0 as the index of their first element which is also called base index. Following is the pictorial representaion of the same array we discussed above:

Mastery 24

Credits:

http://www.tutorialspoint.com/cplusplus/cpp_arrays.htm

http://www.cplusplus.com/doc/tutorial/arrays/


1017 24

Mastery 20

Use of loops with “for”

for loop is a repetition control structure that allows you to efficiently write a loop that needs to execute a specific number of times.

Syntax:

The syntax of a for loop in C++ is:

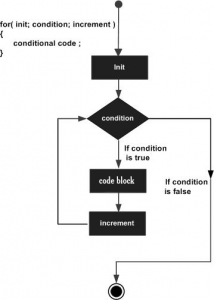
Here is the flow of control in a for loop:

  • The init step is executed first, and only once. This step allows you to declare and initialize any loop control variables. You are not required to put a statement here, as long as a semicolon appears.

  • Next, the condition is evaluated. If it is true, the body of the loop is executed. If it is false, the body of the loop does not execute and flow of control jumps to the next statement just after the for loop.

  • After the body of the for loop executes, the flow of control jumps back up to theincrement statement. This statement allows you to update any loop control variables. This statement can be left blank, as long as a semicolon appears after the condition.

  • The condition is now evaluated again. If it is true, the loop executes and the process repeats itself (body of loop, then increment step, and then again condition). After the condition becomes false, the for loop terminates.

Flow Diagram:

Mastery 20

Example:

When the above code is compiled and executed, it produces the following result:

Credits:

http://www.tutorialspoint.com/cplusplus/cpp_for_loop.htm

1017 20

Use of “else” with a conditional

                                                                                                                          @PablO_CVi

Introducing a conditional with an else.

Here is my code: https://github.com/PablOCVi/Mastery/blob/master/Mastery16.py