We kinda did it in two parts, the first one being the black and white, that you can check out here.
For the “second part”, we researched and found out how to resize the source image using math and arrays. These links were reaaaaaally useful:
http://stackoverflow.com/questions/27351737/c-how-to-shrink-an-image-using-a-pointer-array
http://stackoverflow.com/questions/299267/image-scaling-and-rotating-in-c-c
http://doc.gnu-darwin.org/ImageMagick/www/ImageMagickObject.html
http://www.cplusplus.com/forum/general/2615/
We kinda teamed up with Eduardo, we worked together, and mutually helped each other.
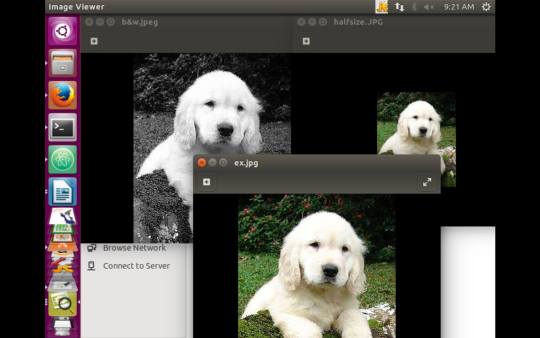
We had a lot of errors during the process about syntax but one we dealt with the most was an error called “segmentation fault”. After battling with it, we found out that our program wasn’t the problem, but the source image was. We looked and tried several images until we found one that worked, which was the golden retriever puppy on the English Wikipedia page of puppies. Eduardo told us that this picture didn’t have the same error and we confirmed that it didn’t.
We are really happy about the outcome of the project.
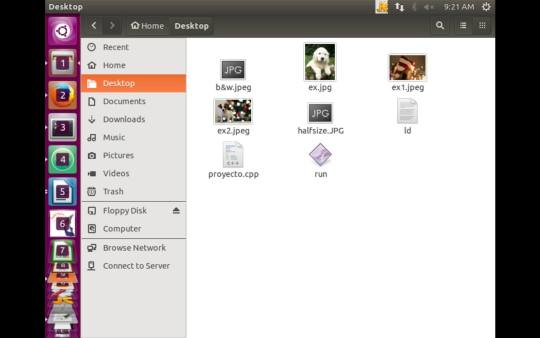
Here are some screenshots:
You can check out our final code here:
https://github.com/kenwbauer/TC101F15_Team06/blob/master/FINALPROJECT.cpp
We kinda did it in two parts, the first one being the black and white, that you can check out here.
For the “second part”, we researched and found out how to resize the source image using math and arrays. These links were reaaaaaally useful:
http://stackoverflow.com/questions/27351737/c-how-to-shrink-an-image-using-a-pointer-array
http://stackoverflow.com/questions/299267/image-scaling-and-rotating-in-c-c
http://doc.gnu-darwin.org/ImageMagick/www/ImageMagickObject.html
http://www.cplusplus.com/forum/general/2615/
We kinda teamed up with Eduardo, we worked together, and mutually helped each other.
We had a lot of errors during the process about syntax but one we dealt with the most was an error called “segmentation fault”. After battling with it, we found out that our program wasn’t the problem, but the source image was. We looked and tried several images until we found one that worked, which was the golden retriever puppy on the English Wikipedia page of puppies. Eduardo told us that this picture didn’t have the same error and we confirmed that it didn’t.
We are really happy about the outcome of the project.
Here are some screenshots:
You can check out our final code here:
https://github.com/kenwbauer/TC101F15_Team06/blob/master/FINALPROJECT.cpp
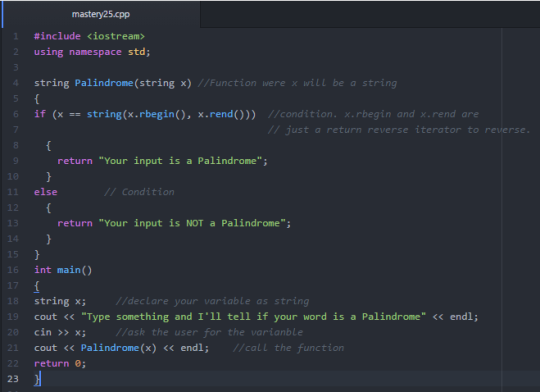
]]>String are things that are represented by a sequence of characters.
We will create a function that works as a palindrome and tells the user if the word he input is a palindrome or not. Do as follows:
- Create a main program and leave a space before it for the function
- Create a function of type string called palindrome
- Condition the user input with VARIABLE.rbegin and VARIABLE.rend. This iterators make the string return reversed to the beginning and end. This is the Palindrome “function”
- In main(), ask the user for the input and call for the function.
Your program should look something like this:
Now let’s test it:

Great! Now you know how to do a basic program using string. If you want to learn more about strings, go to this webpage:
]]>String are things that are represented by a sequence of characters.
We will create a function that works as a palindrome and tells the user if the word he input is a palindrome or not. Do as follows:
- Create a main program and leave a space before it for the function
- Create a function of type string called palindrome
- Condition the user input with VARIABLE.rbegin and VARIABLE.rend. This iterators make the string return reversed to the beginning and end. This is the Palindrome “function”
- In main(), ask the user for the input and call for the function.
Your program should look something like this:
Now let’s test it:
Great! Now you know how to do a basic program using string. If you want to learn more about strings, go to this webpage:
]]>There’s an online compiler and debugging tool called Ideone, which allows us to code online and then test it right there. So, go ahead and open ideone.com
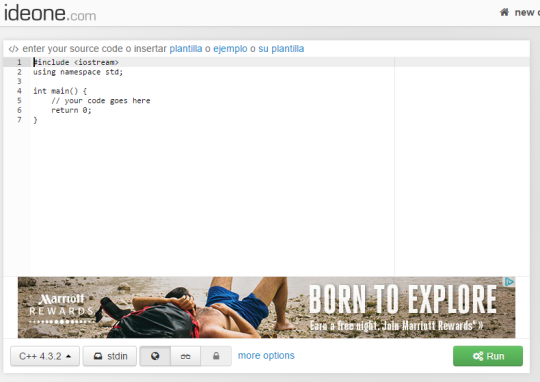
Once you opened the webpage, something similar to this will appear on your screen. On the centre of the webpage is where our programs are written, On the bottom left , we have the language of the source code (which can be changed) and on the bottom right we have the run button.
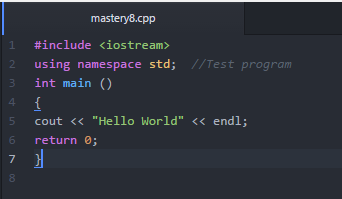
Let’s create a “Hello World” program and run it:
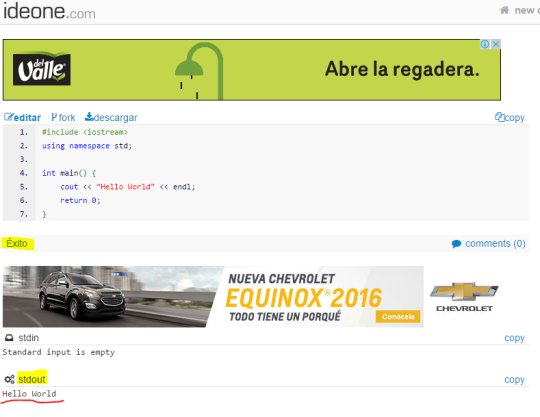
As you can observe, our program was successful and it did output the desired outcome.
Now, just to have fun, let’s see what happens if our program has a mistake:
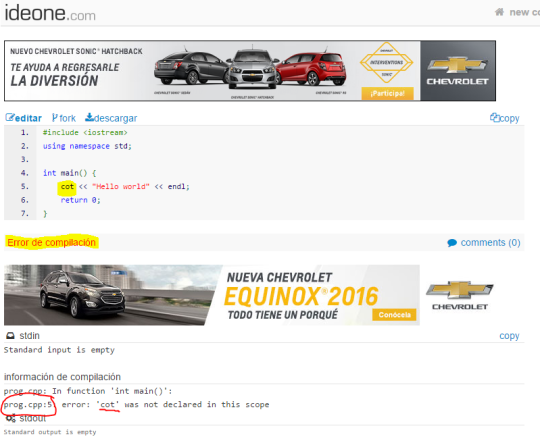
This online tool is great, and now you know how to use it. Congrats!
]]>There’s an online compiler and debugging tool called Ideone, which allows us to code online and then test it right there. So, go ahead and open ideone.com
Once you opened the webpage, something similar to this will appear on your screen. On the centre of the webpage is where our programs are written, On the bottom left , we have the language of the source code (which can be changed) and on the bottom right we have the run button.
Let’s create a “Hello World” program and run it:
As you can observe, our program was successful and it did output the desired outcome.
Now, just to have fun, let’s see what happens if our program has a mistake:
This online tool is great, and now you know how to use it. Congrats!
]]>For the purpose of this mastery, we’ll focus on while and for loops because they are the easiest and most used ones.
On mastery 19 we learned how to use a while loop. The while loop consists of something that will happen WHILE a condition is given. For example: WHILE x is greater or equal than 0, something will happen, and this process will continue to happen WHILE this condition is true.
On mastery 20 we learned how to use a for loop.
A FOR loop is a type of loop which allows you to give specific conditions to it, and then repeat when this conditions are true.
Now, while and for may be seem like they are the same, but they certainly ain’t. The main difference between them is that FOR loops will continue happening for a given number of iterations.
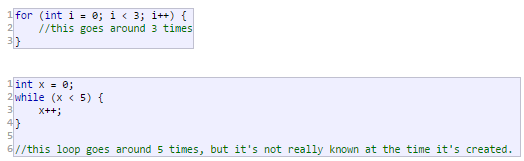
As you may recall, functions often use a for loop because of the iteration part. In someway, FOR loops are “better” when dealing with functions, while WHILE loops are great to work with inside main().
Picture and more information from this webpage.
For the purpose of this mastery, we’ll focus on while and for loops because they are the easiest and most used ones.
On mastery 19 we learned how to use a while loop. The while loop consists of something that will happen WHILE a condition is given. For example: WHILE x is greater or equal than 0, something will happen, and this process will continue to happen WHILE this condition is true.
On mastery 20 we learned how to use a for loop.
A FOR loop is a type of loop which allows you to give specific conditions to it, and then repeat when this conditions are true.
Now, while and for may be seem like they are the same, but they certainly ain’t. The main difference between them is that FOR loops will continue happening for a given number of iterations.
As you may recall, functions often use a for loop because of the iteration part. In someway, FOR loops are “better” when dealing with functions, while WHILE loops are great to work with inside main().
Picture and more information from this webpage.
]]>Switch is a statement that tests a variable for equality in a list of given conditions. It is somehow a summarized version of IF when you have a lot of conditions.
This flow chart may help you understand better, and this webpage too:
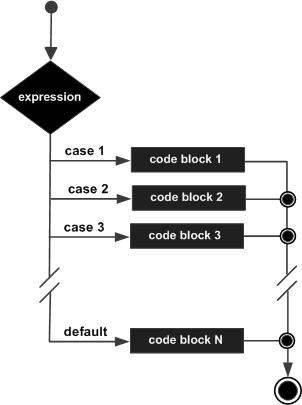
The default syntax of switch goes like this:
switch (expression)
case “condition” : outcome
[default:statement]    //This is used when the variable input isn’t a valid option.
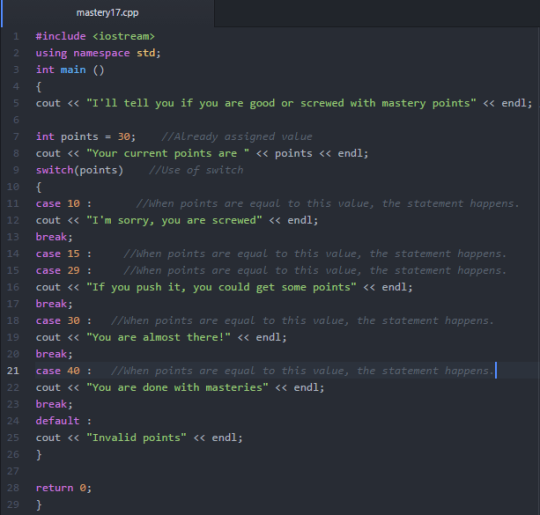
So, for the purpose of this mastery, lets create a program were the user can input his points on masteries so far and tell him if his good or screwed. Do as follows:
- Create our “basic” program.
- Inside the int, declare a char variable with an assigned value.
- Use switch to condition the outcome and tell the user if his good or screwed.
Your program should look something like this:
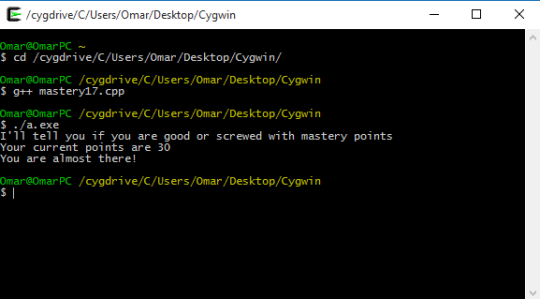
Now let’s test it:
Let’s just play with another value:
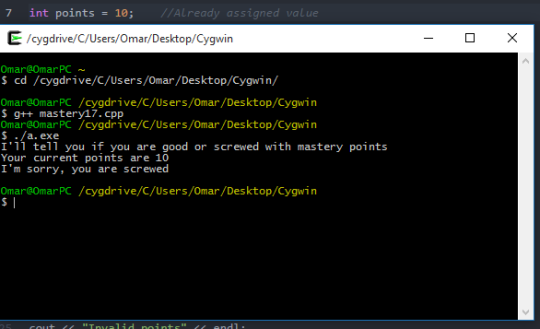
Great! Now you know what and how to use switch conditional.
]]>Switch is a statement that tests a variable for equality in a list of given conditions. It is somehow a summarized version of IF when you have a lot of conditions.
This flow chart may help you understand better, and this webpage too:
The default syntax of switch goes like this:
switch (expression)
case “condition” : outcome
[default:statement]    //This is used when the variable input isn’t a valid option.
So, for the purpose of this mastery, lets create a program were the user can input his points on masteries so far and tell him if his good or screwed. Do as follows:
- Create our “basic” program.
- Inside the int, declare a char variable with an assigned value.
- Use switch to condition the outcome and tell the user if his good or screwed.
Your program should look something like this:
Now let’s test it:
Let’s just play with another value:
Great! Now you know what and how to use switch conditional.
]]>After looking a lot of videos in YouTube and searching so hard on internet we found the way to convert the image into a scale so it could be smallest.
After doing the “hard part” we search on internet how to convert an image into gray. All this functions were made with arrays, rows and columns and it is hard to understand it all but if you look closely you will find that, first, the program count the number of pixels it has. Then, it change it the color of the pixels for the gray one. For the scale, it count the pixels and reduce it by the half by a grouping them.
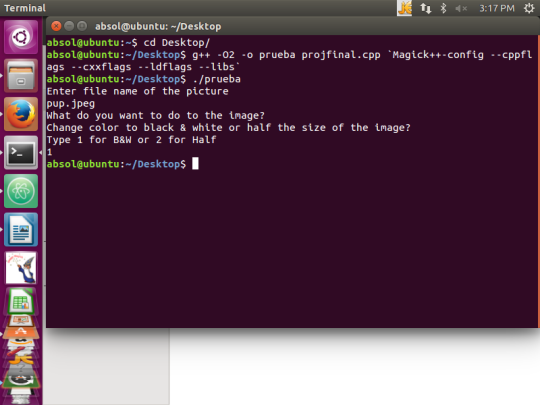
The only problem was that it doesn’t work with .jpg images, only with .jpeg and we didn’t find out why 
I’m exiting for doing this because I was so stressed with a lot of projects and take us a while to find the way of doing it. I need to say that I need to learn more functions and commands for improving my programing but I think I learned very well in this class, good job ken!!

GitHub code: https://github.com/kenwbauer/TC101F15_Team18/blob/master/ProyectoFinal.cpp
Luis Alfonso Duarte Palacios
Christian Orozco

![]()
Coding conventions are just a set of “guidelines” that talk about the style to format a code. For example, how to correctly use braces, commas, comments, capitalization, etc. You can read a lot more of these “rules” in these webpages:
https://gcc.gnu.org/wiki/CppConventions
Since masteries 1 and 7 we’ve been using the correct style and format. If we weren’t, we could’ve just written all our codes in one line instead of multiple lines, for example, tell me how do you prefer to read a code, like this? ->
Or like this? ->

Which one is easier to read?
And know you now why there are coding conventions: to make everything look nice and easy to read.
]]>Coding conventions are just a set of “guidelines” that talk about the style to format a code. For example, how to correctly use braces, commas, comments, capitalization, etc. You can read a lot more of these “rules” in these webpages:
https://gcc.gnu.org/wiki/CppConventions
Since masteries 1 and 7 we’ve been using the correct style and format. If we weren’t, we could’ve just written all our codes in one line instead of multiple lines, for example, tell me how do you prefer to read a code, like this? ->
Or like this? ->
Which one is easier to read?
And know you now why there are coding conventions: to make everything look nice and easy to read.
]]>
This isn’t a clever title
This WSQ was not as hard as I thought, but it required research and a full understanding of what was inside the text file. I checked these webpages, I think they are useful:
http://www.cplusplus.com/doc/tutorial/files/
http://www.cplusplus.com/forum/beginner/8388/
And you can check out my code here.
]]>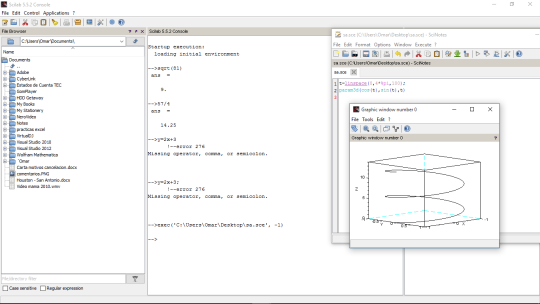
Last WSQ of the semester, I can’t explain how fast it went!
I found Scilab as a very useful tool since it can do many things simultaneously. You have a text editor and it also graphs! It is indeed amazing and I know it may be useful in the near future for the career.
]]>
Last WSQ of the semester, I can’t explain how fast it went!
I found Scilab as a very useful tool since it can do many things simultaneously. You have a text editor and it also graphs! It is indeed amazing and I know it may be useful in the near future for the career.
]]>Basic command-lines:
http://www.imagemagick.org/script/command-line-tools.php
http://www.imagemagick.org/script/command-line-processing.php
Convert input image to b&w/grayscale:
http://www.imagemagick.org/script/color.php
http://www.imagemagick.org/script/color-management.php
http://stackoverflow.com/questions/13317753/convert-rgb-to-grayscale-in-imagemagick-command-line
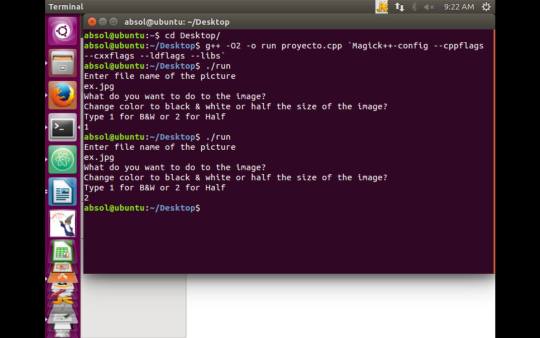
And that’s pretty much it. We will try to finish the project by doing the “second part” about resizing the image tomorrow. In the meantime, you can check our code here.
P.S. Here is how it’s shown in Ubuntu:
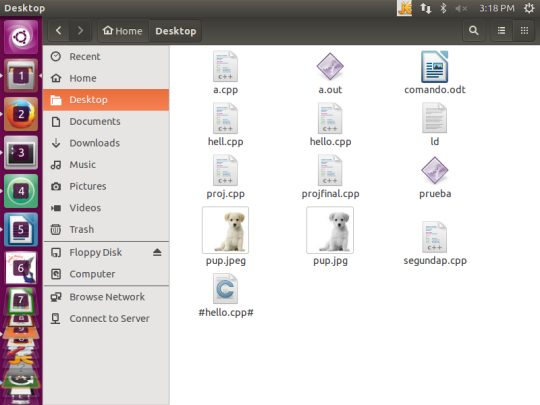
Basic command-lines:
http://www.imagemagick.org/script/command-line-tools.php
http://www.imagemagick.org/script/command-line-processing.php
Convert input image to b&w/grayscale:
http://www.imagemagick.org/script/color.php
http://www.imagemagick.org/script/color-management.php
http://stackoverflow.com/questions/13317753/convert-rgb-to-grayscale-in-imagemagick-command-line
And that’s pretty much it. We will try to finish the project by doing the “second part” about resizing the image tomorrow. In the meantime, you can check our code here.
P.S. Here is how it’s shown in Ubuntu: