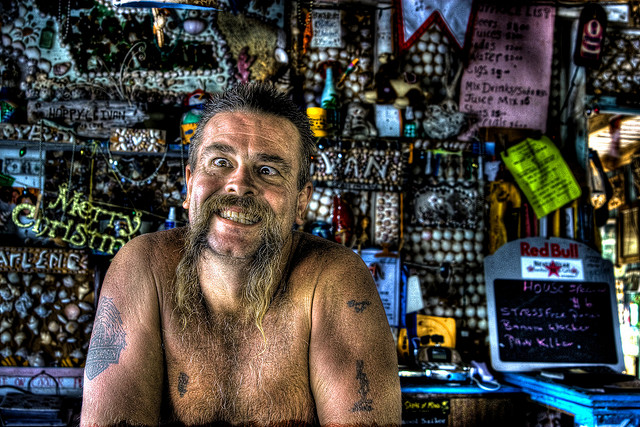
It’s over. It’s all over!! “Stress Free Bar” by Jason St. Peter. Link: https://www.flickr.com/photos/fiftypercentchanceofrain/3769770467/
Redundant title is redundant. After much work, tears, sweat and a couple of sleep-deprivation sessions at the Biblioteca, we did it. Messily, and with two codes worth of work, but we did it. Montse had a lot of trouble simply getting the Magick++ library to cooperate with us and it just did not work in my computer. I really have to check it sometime… Anyway, the “good” code is the one titled Final Project.cpp, while the others are alternates with discrepancies (see Week #3). All we have left to do is wait for the reckoning to come.
Here’s the alternate (code for “sucky”) code:

Aaaand finally the good and final GitHub code link.

It's been a hard week for us, we started the project 4 days ago after we finished all of our tasks since the past week, (Finishing the final proyect of mathematics and all the other stuff of this course). Manuel and I started with some help (a lot) of a friend of his (his roomie who is having classes with you but in the other c++ course), he practically told us everything about installing ubuntu and the magick++ library. This week i surely learned how to use matrixes (Thing i didn't know before not until this project). So we think this program works, we did final modifications earlier (we didnt have time to prove them, but the last time we proved it, it worked) sorry for the delay, thanks.
Here's the code: https:/
It’s been a hard week for us, we started the project 4 days ago after we finished all of our tasks since the past week, (Finishing the final proyect of mathematics and all the other stuff of this course). Manuel and I started with some help (a lot) of a friend of his (his roomie who is having classes with you but in the other c++ course), he practically told us everything about installing ubuntu and the magick++ library. This week i surely learned how to use matrixes (Thing i didn’t know before not until this project). So we think this program works, we did final modifications earlier (we didnt have time to prove them, but the last time we proved it, it worked) sorry for the delay, thanks.
Here’s the code: https:/

![]()
#Project Here is the code of our project. I made earlier a post about some problems and the description of them. It is on github. I left as well some codes that were used to test our library the ones inside the prenthesis. It was difficult I have to say.
https://github.com/kenwbauer/TC101F15_Team17/blob/master/FINAL%20CODE
]]>#Project Here is the code of our project. I made earlier a post about some problems and the description of them. It is on github. I left as well some codes that were used to test our library the ones inside the prenthesis. It was difficult I have to say.
https:/
After a whole day of failed attemps, we couldn’t crop the image to half its size. It resulted more complicated than expected because the program did not recognize arrays of Colors, we could only use vectors and it turned difficult solving it pixel by pixel. So we decided to add other functions, as flipping the image by using similar concepts. I wish we could have solved it, but it was very difficult. This will be my last entry for this project, as an evidence of our effort. Thanks!
]]>I do the code in my laptop and uploaded to GitHub so that way Hector could see if there’s any error because in mine I don’t have Magick++
It was easy because we only have to put the two previous codes in this final code and also we ad the option t rotate the image
Here is the code
https://github.com/kenwbauer/TC101F15_Team19/blob/master/FINAL
NOW THE ONLY THING LEFT IS THE EXAM!!!!

![]()

Hi, finally here is our final project which in our opinion it was a little bit complicated because the use and the installation of the magick libray but ones we have that part of the project it become more easy to work on it, as you can see in the code we put a little menu for the user to choose what he or she wants to do to the image in the first option is the redimention par and in the second is the change of color to black and white, also we use the string and cmath library to work. It was a grat experience and we apply eavrithing we saw in class for making this possible.
Thanks for this amazing course, it was a grat experience
Rodrigo Tapia H
Victor Hugo Fernadez
https:/
#PROJECT #TC1017
]]>Finally, my project is finished, of course with some help but, who didn’t need it?
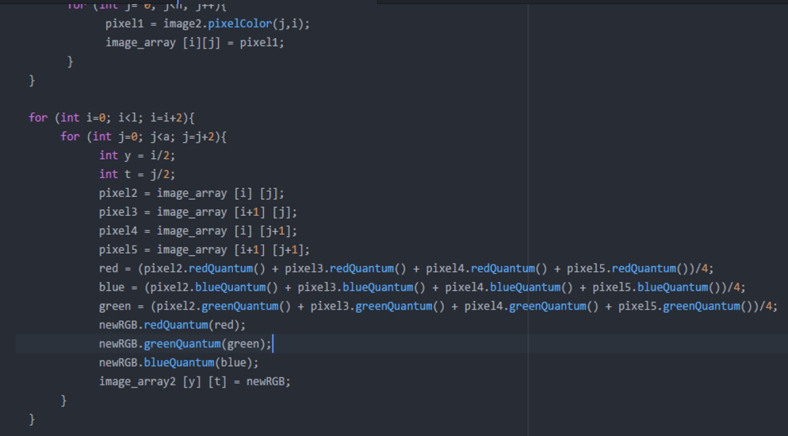
In the code were 2 functions, one for grayscale and the other for scale (1/2);
What the grayscale function did was basically taking the RGB color property (1) for each pixel of the image, and getting the average of that 3 properties (redQuantum, greenQuantum and blueQuantum) to create a new color (2) and then creating a pixel with that color, to then add it to the picture in its correct place.
The scale function basically did the same, but now with 4 pixels. I mean it took the RGB of 4 pixels (2 up and 2 down), got the average of redQuantum, greenQuantum and blueQuantum and give that RGB properties to a new pixel, which takes place in a new picture that is half high and half wide, created by taken the size of the original and dividing it by 2. (3)
Here is our code: Hell yeah here it is
Now, my experience during this project… A lot of trouble, since trying to install magick++ on Mac to then giving up and installing it on Ubuntu… But I was a good friend and told everybody to stop losing their time trying to install it on Mac o Windows, so everybody did it on Ubuntu.
I, as at least half the class, got help from the codes of some partners, in my case, specially Miguel Angel Cardenas so, I thank him, who probably doesn’t know who I am but that’s mutual.
When I first saw his code, it seemed impossible to understand, but with a little of help I understood it and started to change what I though it worked.
There was a really big problem, which from my “circle” I was the first to suffer: “segmentation fault (core dumped)” after compiling and . First I though it was my compiler, but then everybody started to get it. So, after some hours spent with Omar, Alejandra, and Newton trying to fix it, until we realized that it was a problem with big pictures, which we couldn’t fix.
But after all this hours spent, it was done. And since now, and for the next years, every time I get involved in something hard like this, there’s one simple quote I will remember :”It’s OK to fail”.
- http://stackoverflow.com/questions/28151240/get-rgb-color-with-magick-using-c
- http://www.johndcook.com/blog/2009/08/24/algorithms-convert-color-grayscale/
- http://www.smashingmagazine.com/2015/06/efficient-image-resizing-with-imagemagick/

![]()
96 Normal 0 21 false false false ES-TRAD X-NONE X-NONE /* Style Definitions */ table.MsoNormalTable {mso-style-name:"Tabla normal"; mso-tstyle-rowband-size:0; mso-tstyle-colband-size:0; mso-style-noshow:yes; mso-style-priority:99; mso-style-parent:""; mso-padding-alt:0cm 5.4pt 0cm 5.4pt; mso-para-margin:0cm; mso-para-margin-bottom:.0001pt; mso-pagination:widow-orphan; font-size:12.0pt; font-family:Calibri; mso-ascii-font-family:Calibri; mso-ascii-theme-font:minor-latin; mso-hansi-font-family:Calibri; mso-hansi-theme-font:minor-latin; mso-fareast-language:EN-US;}
Hi, this is a blogpost about my #Project I wanted to do this since a few days ago but I had no time, you know its finals and everything gets crazy. First I would like to start saying this was hell, way too difficult. I first had to search all over the internet for information. I had a lot of problems with using the library on mac so I did it in Ubuntu. Once I had it I couldn’t even compile the sample program, that is when I went with Ken and asked for some help, the thing was I had installed another thing I thought it was the library and that is why I could not compile anything. Once everything with magick++ was set up I started the coding process, we have the code know the thing is that, I don´t finish to understand why, but it only works with some images not with all of them. I don´t know if it is something with my code or the Ubuntu software or other thing. Here are some pictures of the process, I first published in github some separated codes that were the sample ones, but with some modifications.
I did this one with the same crop one
This is the picture that my code lets me modify... I will post the final code later today.
It is in jpeg format. Other different images showed up some error i couldt figure out
I will post later tonight more about this and the final project see you...
]]>
Hi, this is a blogpost about my #Project I wanted to do this since a few days ago but I had no time, you know its finals and everything gets crazy. First I would like to start saying this was hell, way too difficult. I first had to search all over the internet for information. I had a lot of problems with using the library on mac so I did it in Ubuntu. Once I had it I couldn’t even compile the sample program, that is when I went with Ken and asked for some help, the thing was I had installed another thing I thought it was the library and that is why I could not compile anything. Once everything with magick++ was set up I started the coding process, we have the code know the thing is that, I don´t finish to understand why, but it only works with some images not with all of them. I don´t know if it is something with my code or the Ubuntu software or other thing. Here are some pictures of the process, I first published in github some separated codes that were the sample ones, but with some modifications.
I did this one with the same crop one
This is the picture that my code lets me modify… I will post the final code later today.
It is in jpeg format. Other different images showed up some error i couldt figure out
I will post later tonight more about this and the final project see you…
]]>