In simple terms a nested if is when you write an IF inside another IF braces.
This is the basic structure of a nested if.
if( boolean_expression 1)
{
   // Executes when the boolean expression 1 is true
   if(boolean_expression 2)
   {
      // Executes when the boolean expression 2 is true
   }
}
And of course we can nest else if in the similar way as you nest the if statement.
This is an example of a program with nested if-else.
#include <iostream>
using namespace std;

int main ()
{
   int marks = 55;
   if( marks >= 80) {
      cout << "U are 1st class !!";
   }
   else {
      if( marks >= 60) {
          cout << "U are 2nd class !!";
      }
      else {
	if( marks >= 40) {
  	  cout << "U are 3rd class !!";
	}
	else {
	  cout << "U are fail !!";
        }
      }
   }
   return 0;
}
And this will be the output:
U are 3rd class !!
-The Admin.

![]()
My buddy and I finally acomplish our project for our TC101 class.
Well, basically, our program had to do the following:
“You will create a command-line program that uses two-dimensional arrays or matrices to process images. You cannot simply call graphics libraries to manipulate the images directly but must implement the functions with your own algorithms. The input to each operation is an image (you choose to support any of JPEG, PNG) and the output is the modified image. The idea is to have a final project which shows your mastery of the topics in this course”.
I was really hard to acomplish but Eduardo and I worked together and we made it!
The user is able to type in the name of the file (a picture) and the program will process the image outputting a different file than the first one.
There is a huge code!
It looks like this:
#include <Magick++.h>
#include <iostream>
#include <cmath>
using namespace std;
using namespace Magick;

void grayscale (string in, string out){
  Image image;
  image.read( in );
  int x = image.rows();
  int y = image.columns();
  Color image_array [x] [y];
  Color original;
  Color graysc;
  int col;


  for (int i=0; i < x; i++){
    for (int u = 0; u < y; u++){
      original = image.pixelColor(u,i);
      image_array [i][u] = original;
      col = (original.redQuantum() + original.greenQuantum() + original.blueQuantum()) / 3;
      graysc.redQuantum(col);
      graysc.greenQuantum(col);
      graysc.blueQuantum(col);
      image_array [i] [u] = graysc;
      image.pixelColor(u, i, graysc);
    }
  }
  image.write( out );
}

void scale(string in, string out){
  Image image;
  image.read( in );

  int x = image.rows();
  int y = image.columns();
  int xf = x/2;
  int yf = y/2;
  Image image2( Geometry(yf, xf), Color(MaxRGB, MaxRGB, MaxRGB, 0));
  Color image_array [x] [y];
  Color image_array2 [xf] [yf];
  Color pixel1, pixel2, pixel3, pixel4, pixel5;
  int red,blue,green;
  Color newRGB, newRGB2;

  for (int i=0; i < x; i++){
        for (int u = 0; u < y; u++){
              pixel1 = image.pixelColor(u,i);
              image_array [i][u] = pixel1;
        }
  }

  for (int i=0; i < x; i = i+2){
       for (int u = 0; u < y; u = u+2){
       	     int x2 = i/2;
       	     int y2 = u/2;
             pixel2 = image_array [i] [u];
             pixel3 = image_array [i+1] [u];
             pixel4 = image_array [i] [u+1];
             pixel5 = image_array [i+1] [u+1];
             red = (pixel2.redQuantum() + pixel3.redQuantum() + pixel4.redQuantum() + pixel5.redQuantum())/4;
             blue = (pixel2.blueQuantum() + pixel3.blueQuantum() + pixel4.blueQuantum() + pixel5.blueQuantum())/4;
             green = (pixel2.greenQuantum() + pixel3.greenQuantum() + pixel4.greenQuantum() + pixel5.greenQuantum())/4;
             newRGB.redQuantum(red);
             newRGB.greenQuantum(green);
             newRGB.blueQuantum(blue);
             image_array2 [x2] [y2] = newRGB;
       }
  }

  for (int i=0; i < xf; i++){
       for (int u = 0; u < yf; u++){
             newRGB2 =image_array2 [i] [u];
             image2.pixelColor(u, i, newRGB2);
       }
  }

 image2.write( out );
}

int main(int argc,char **argv)
{
  InitializeMagick(*argv);

  try {
 string im;
 string out;
 int ans;
 cout << "Write your file name: ";
 cin >> im;
 cout<< "Write the name of your output file: ";
 cin>>out;
 cout<<"What do you wanna do?"<<endl<<"1. Grayscale."<<endl<<"2. Scale (1/2)."<<endl;
 cin>>ans;

while (ans != 1 && ans != 2){
  cout<<"Try again please: ";
  cin>>ans;}
if(ans == 1){
 grayscale(im, out);}
 if (ans == 2){
 scale(im, out);
}
}
  catch( Exception &error_ )
    {
      cout << "Caught exception: " << error_.what() << endl;
      return 1;
    }
  return 0;
//// c++ -O2 -o prog prog.cpp `Magick++-config --cppflags --cxxflags --ldflags --libs`
}
There is also a Repository made it in Github and that’s were our teacher is going to check it out.
Any question feel completely free to ask.
Thank you guys for everything.
-The Admin.

![]()
Well, first of all strings are a one-dimensional array of characters which is terminated by a null character ‘�’. Thus a null-terminated string contains the characters that comprise the string followed by a null.
The following declaration and initialization create a string consisting of the word “Hello”. To hold the null character at the end of the array, the size of the character array containing the string is one more than the number of characters in the word “Hello.”
char greeting[6] = {'H', 'e', 'l', 'l', 'o', '�'};
If you follow the rule of array initialization, then you can write the above statement as follows:
char greeting[] = "Hello";
Following is the memory presentation of above defined string in C/C++:

Actually, you do not place the null character at the end of a string constant. The C++ compiler automatically places the ‘�’ at the end of the string when it initializes the array. Let us try to print above-mentioned string:
#include <iostream> using namespace std; int main () { char greeting[6] = {'H', 'e', 'l', 'l', 'o', '�'}; cout << "Greeting message: "; cout << greeting << endl; return 0; }
When the above code is compiled and executed, it produces result something as follows:
Greeting message: Hello
For any other doubt please feel free to write it in the comments.
Sources:
http://stackoverflow.com/questions/10219225/c-create-string-of-text-and-variables
http://www.cs.fsu.edu/~myers/c++/notes/stringobj.html
-The Admin

![]()
What is Scilab ?
Scilab is free and open source software for numerical computation providing a powerful computing environment for engineering and scientific applications.
What does Scilab do ?
Scilab includes hundreds of mathematical functions. It has a high level programming language allowing access to advanced data structures, 2-D and 3-D graphical functions.
A large number of functionalities is included in Scilab:
- Maths & Simulation
For usual engineering and science applications including mathematical operations and data analysis. - 2-D & 3-D Visualization
Graphics functions to visualize, annotate and export data and many ways to create and customize various types of plots and charts. - Optimization
Algorithms to solve constrained and unconstrained continuous and discrete optimization problems. - Statistics
Tools to perform data analysis and modeling - Control System Design & Analysis
Standard algorithms and tools for control system study - Signal Processing
Visualize, analyze and filter signals in time and frequency domains. - Application Development
Increase Scilab native functionalities and manage data exchanges with external tools. - Xcos – Hybrid dynamic systems modeler and simulator
Modeling mechanical systems, hydraulic circuits, control systems…
Where can I get this Software?
As always, just clic on BATMAN.
And also, very important! You will need a beginers guide that will help you out in your familiarization with the program. To download the guide just clic on ROBIN.
Here is a video with basic operations made in Scilab.
-The Admin.

![]()
Vector Constructors.
The available constructors for a vector are given by:
1	vector<int> testVector;
2	vector<long> testVector(10);
3	vector<float> testVector(5,1.0);
The first syntax declares an empty vector capable of storing the integer datatype. The second declares a vector with storage space for 10 long integers, each of which is initialized to the default value for the type. The final line declares a vector with storage for 5 floats, and initializes each of their values to 1.0. Any valid type can be used for any of the constructors.
There is also a copy constructor for the std::vector class. The following code creates a vectors of integers with 10 copies of the number 5, and duplicates the vector into a new one using the copy constructor:
01	#include <iostream>
02	#include <vector>
03
04	using namespace std;
05
06	int main(int argc, char** argv) {
07
08	    vector<int> vectorOne(10,5);
09
10	    vector<int> vectorTwo(vectorOne);
11
12	    return EXIT_SUCCESS;
13	}
Accessing Elements of a Vector.
There are a number of ways to access the elements of a vector. For the moment, I will focus on two of them, one safe and one unsafe. And as a reminder, C++ vectors (and other STL containers), like raw C/C++ arrays, are accessed with indices starting at zero. This means that the first element is at position 0 in the vector, and the last element is at position (number of elements)-1.
The vector class contains a member function at() for accessing individual elements of a vector. This is the safe way of accessing elements, since attempting to access an element beyond the valid range will cause an exception to be thrown. However, the raw data stored in the vector can still be accessed using the usual [] operator, just like in a raw array. Unfortunately, just like with a raw array of data, overrunning the end of the vector using the [] operator can cause weird and unexpected things to occur, such as program crashes or unexpected results. It may also return garbage data that follows the meaningful data of the vector, which has the potential to be disastrous if it is used in subsequent operations. The following two code snippets demonstrate each of these access methods:
Safe access version:
#include <iostream>
#include <vector>
using namespace std;


int main(int argc, char** argv) {

    /*  Initialize vector of 10 copies of the integer 5 */

    vector<int> vectorOne(10,5);

    /*  Display size of vector */

    cout << "Size of vector is " << vectorOne.size() << " elements." << endl;

    /*  run through the vector and display each element, using size() to determine index boundary */

    for (long index=0; index<(long)vectorOne.size(); ++index) {

        cout << "Element " << index << ": " << vectorOne.at(index) << endl;
    }

    return EXIT_SUCCESS;
}
Unsafe access version
#include <iostream>
#include <vector>

using namespace std;


int main(int argc, char** argv) {


    /*  Initialize vector of 10 copies of the integer 5 */
    vector<int> vectorOne(10,5);


    /*  run through the vector and display each element, if possible */

    for (int index=0; index<20; ++index) {

        cout << vectorOne[index] << endl;

    }
    return EXIT_SUCCESS;
}
Sources:
http://www.cplusplus.com/reference/vector/vector/vector/
-The Admin.

![]()
switch (expression)
{
  case constant1:
     group-of-statements-1;
     break;
  case constant2:
     group-of-statements-2;
     break;
  .
  .
  .
  default:
     default-group-of-statements
}
Basically, what “Switch” actually does is to evaluate expression and checks if it is equivalent to constant1; if it is, it executes group-of-statements-1 until it finds the break statement. When it finds this break statement, the program jumps to the end of the entire switch statement (the closing brace).
If expression was not equal to constant1, it is then checked against constant2. If it is equal to this, it executes group-of-statements-2 until a break is found, when it jumps to the end of the switch. Finally, if the value of expression did not match any of the previously specified constants (there may be any number of these), the program executes the statements included after the default: label, if it exists (since it is optional). Both of the following code fragments have the same behavior, demonstrating the if-else equivalent of a switch statement:
| switch example | if-else equivalent |
switch (x) { case 1: cout << "x is 1"; break; case 2: cout << "x is 2"; break; default: cout << "value of x unknown"; } |
if (x == 1) { cout << "x is 1"; } else if (x == 2) { cout << "x is 2"; } else { cout << "value of x unknown"; } |
Here is a simple example of a code with a “Switch” Statement in it.
switch (x) {
  case 1:
  case 2:
  case 3:
    cout << "x is 1, 2 or 3";
    break;
  default:
    cout << "x is not 1, 2 nor 3";
  }
Sources:
http://en.cppreference.com/w/cpp/language/switch
http://www.cplusplus.com/doc/tutorial/control/#switch
-The Admin.

![]()
I probably won’t get no sleep in a couple of days but hey, sleeping is for the weaks and the procrastinators, I guess.
Anyways, I’m commited to achieve all my assignments, so don’t worry, They will be posted on time!
Keep Sleeping and I will be around here doing all my homework!
-The admin.

![]()
In this WSQ #13 we had to write a program which do the following:
“The function should receive a number and return floating point number. Obviously you should test your function, so create a main program that asks the user a value, calculates the square root and displays that.”
So I had to do some research and a really cool video in Youtube help me a lot! From the tutorial I just had to change double to float and put a “Cin” so the user could type in the number that he wants.
This is the tutorial that helped me out!
And as always, Clic on Batman to see my code!
Here is a screenshot of the program running:
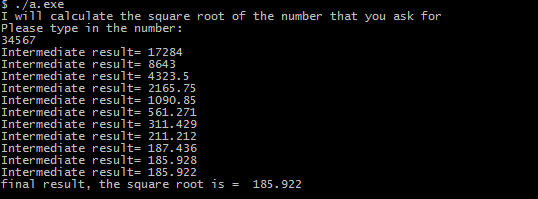
Stay true!
-The Admin.

![]()
The first step was to be able to ask the user for the name os the file, so he could type in the name and our program will look for it and process the image in order to change it.
That’s what we got so far and we are now working on the conversion of the pixels from color to B&W.
Hopefully everything will be ready before the deadline of November 25 at midnight.
Goodnight!
-The Admin.

![]()
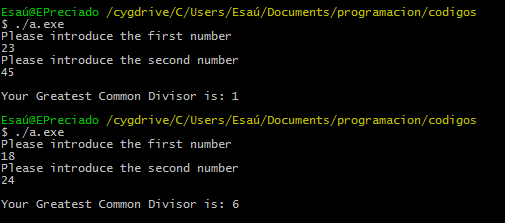
Euclids Algorithm:
The Euclidean algorithm is based on the principle that the greatest common divisor of two numbers does not change if the larger number is replaced by its difference with the smaller number. For example, 21 is the GCD of 252 and 105 (252 = 21 × 12 and 105 = 21 × 5), and the same number 21 is also the GCD of 105 and 147 = 252 − 105.
Here is the code of the program.
#include <iostream>
using namespace std;

int gcd(int a, int b){//Making the function
	int g=a;
	int h,l;
	int f=2;
	if(a==0){
		return a;
	}
		while(g>0){//Doing a loop
		if(g==0){
			goto exit;
		}
		g=a%b;
		a=b;
		b=g;
		}
	if (l=1000){
	exit:
	g=a;
	}
	return g;
}

int main(){
int a, b;
cout<<"Please introduce the first number"<<endl;
cin>>a;
cout<<"Please introduce the second number"<<endl;
cin>>b;
cout<<endl;

cout<<"Your Greatest Common Divisor is: "<<gcd(a,b)<<endl;

return 0;
}
Also, Here is the link to the code in Github: BATMAN.
And of course, as always, the picture of the execution of the program on Cygwin.
-The Admin.

![]()