Creación y uso de strings en C++
Una de las utiliidades de C++ es la existencia de "strings" (cadenas de texto) como parte del lenguaje.
A continuación veremos su manejo primero con un ejemplo sencillo:
#e0e0e0; border-radius: 4px; background-color: #fcfcfc;">#include string>
#include iostream>
using namespace std;

main()
{
string mensaje;
mensaje = "Hola";
cout  mensaje;
}
El manejo básico de las cadenas no presenta alguna dificultad:
- Se declaran como cualquier otra variable( string cadena )
- Se les asigna valor con el signo = , como se hace con los números enteros.
- Su valor se muestra en pantalla con "cout", igual que para las demás variables.
Así que veamos otro ejemplo un poco más complejo:
#e0e0e0; border-radius: 4px; background-color: #fcfcfc;">#include string>
15: #include iostream>
16: using namespace std;
17:
18: main()
19: {
20:  string texto1, texto2 = "Hola ", texto3("Que tal");
21:
22:  texto1 = texto2 + texto3 + " estas? ";
23:  cout  texto1  "n";
24:  string subcadena (texto1, #a52a2a; font-size: medium;">2, #a52a2a; font-size: medium;">6); // 6 letras de texto1, desde la tercera
25:  cout  subcadena  "n";
26:  string subcadena2;
27:  subcadena2 = texto1.substr(#a52a2a; font-size: medium;">0, #a52a2a; font-size: medium;">5); // 5 letras de texto1, desde el comienzo
28:  texto1.insert(#a52a2a; font-size: medium;">5, "Juan "); // Inserto un texto en la posicion 6
29:  cout  texto1  "n";
30:  texto2.replace(#a52a2a; font-size: medium;">1, #a52a2a; font-size: medium;">2, "ad"); // Cambio 2 letras en la posicion 2
31:  cout  texto2  "n";
32:  cout  "La longitud de texto1 es "  texto1.size()  "n";
33:  cout  "La tercera letra de texto1 es "  texto1[#a52a2a; font-size: medium;">2]
34:     " o bien "  texto1.at(#a52a2a; font-size: medium;">2)  "n";
35:  if (texto2 == "Hada ")
36:    cout  "Texto 2 es Hadan";
37: }
La explicación para el código seria la siguiente:
- Se puede crear una cadena sin valor inicial haciendo string texto1;
- Se le puede dar una valor inicial a la vez que se declara, haciendo string texto2 = "Hola "; o bien string texto3("Que tal");
- Se puede crear una cadena formada por varias, concateándolas (sumándolas), usando el signo +, así: texto1 = texto2 + texto3 + " estas? ";
- Se puede crear una subcadena a partir de un trozo de otra, la vez que se declara, así: string subcadena (texto1, 2, 6);
- O bien se puede extraer un fragmento posteriormente: texto1.substr(0, 5);
- Se puede insertar texto en el interior de una cadena: texto1.insert(5, "Juan ");
- O reemplazar ciertas letras por otras: texto2.replace(1, 2, "ad");
- Se puede saber el tamaño (cantidad de letras) de la cadena: texto1.size()
- Se puede acceder a una posición siguiendo el estándar de C: texto1[2]
- O bien usando la función "at": texto1.at(2)
- Se puede comprobar el valor de una cadena (el texto almacenado) con ==, así: if (texto2 == "Hada ") ...
Referencias: http://www.aprendeaprogramar.com/mod/resource/view.php?id=172
Continue reading ]]>Creación y uso de strings en C++
Una de las utiliidades de C++ es la existencia de “strings” (cadenas de texto) como parte del lenguaje.
A continuación veremos su manejo primero con un ejemplo sencillo:
#e0e0e0; border-radius: 4px; background-color: #fcfcfc;">#include string>
#include iostream>
using namespace std;

main()
{
string mensaje;
mensaje = "Hola";
cout  mensaje;
}
El manejo básico de las cadenas no presenta alguna dificultad:
- Se declaran como cualquier otra variable( string cadena )
- Se les asigna valor con el signo = , como se hace con los números enteros.
- Su valor se muestra en pantalla con “cout”, igual que para las demás variables.
Así que veamos otro ejemplo un poco más complejo:
#e0e0e0; border-radius: 4px; background-color: #fcfcfc;">#include string>
15: #include iostream>
16: using namespace std;
17:
18: main()
19: {
20:  string texto1, texto2 = "Hola ", texto3("Que tal");
21:
22:  texto1 = texto2 + texto3 + " estas? ";
23:  cout  texto1  "n";
24:  string subcadena (texto1, #a52a2a; font-size: medium;">2, #a52a2a; font-size: medium;">6); // 6 letras de texto1, desde la tercera
25:  cout  subcadena  "n";
26:  string subcadena2;
27:  subcadena2 = texto1.substr(#a52a2a; font-size: medium;">0, #a52a2a; font-size: medium;">5); // 5 letras de texto1, desde el comienzo
28:  texto1.insert(#a52a2a; font-size: medium;">5, "Juan "); // Inserto un texto en la posicion 6
29:  cout  texto1  "n";
30:  texto2.replace(#a52a2a; font-size: medium;">1, #a52a2a; font-size: medium;">2, "ad"); // Cambio 2 letras en la posicion 2
31:  cout  texto2  "n";
32:  cout  "La longitud de texto1 es "  texto1.size()  "n";
33:  cout  "La tercera letra de texto1 es "  texto1[#a52a2a; font-size: medium;">2]
34:     " o bien "  texto1.at(#a52a2a; font-size: medium;">2)  "n";
35:  if (texto2 == "Hada ")
36:    cout  "Texto 2 es Hadan";
37: }
La explicación para el código seria la siguiente:
- Se puede crear una cadena sin valor inicial haciendo string texto1;
- Se le puede dar una valor inicial a la vez que se declara, haciendo string texto2 = “Hola “; o bien string texto3(“Que tal”);
- Se puede crear una cadena formada por varias, concateándolas (sumándolas), usando el signo +, así: texto1 = texto2 + texto3 + ” estas? “;
- Se puede crear una subcadena a partir de un trozo de otra, la vez que se declara, así: string subcadena (texto1, 2, 6);
- O bien se puede extraer un fragmento posteriormente: texto1.substr(0, 5);
- Se puede insertar texto en el interior de una cadena: texto1.insert(5, “Juan “);
- O reemplazar ciertas letras por otras: texto2.replace(1, 2, “ad”);
- Se puede saber el tamaño (cantidad de letras) de la cadena: texto1.size()
- Se puede acceder a una posición siguiendo el estándar de C: texto1[2]
- O bien usando la función “at”: texto1.at(2)
- Se puede comprobar el valor de una cadena (el texto almacenado) con ==, así: if (texto2 == “Hada “) …
Referencias: http:/
Reading and writing of files in C++
Opening a File:
A file must be opened before you can read from it or write to it. Either the ofstream or fstreamobject may be used to open a file for writing and ifstream object is used to open a file for reading purpose only.
Following is the standard syntax for open() function, which is a member of fstream, ifstream, and ofstream objects.
#d6d6d6;">void open(const char *filename, ios::openmode mode);
Here, the first argument specifies the name and location of the file to be opened and the second argument of the open() member function defines the mode in which the file should be opened.
| Mode Flag | Description |
|---|---|
| ios::app | Append mode. All output to that file to be appended to the end. |
| ios::ate | Open a file for output and move the read/write control to the end of the file. |
| ios::in | Open a file for reading. |
| ios::out | Open a file for writing. |
| ios::trunc | If the file already exists, its contents will be truncated before opening the file. |
You can combine two or more of these values by ORing them together. For example if you want to open a file in write mode and want to truncate it in case it already exists, following will be the syntax:
#d6d6d6;">ofstream outfile;
outfile.open("file.dat", ios::out | ios::trunc );
Similar way, you can open a file for reading and writing purpose as follows:
#d6d6d6;">fstream  afile;
afile.open("file.dat", ios::out | ios::in );
Closing a File
When a C++ program terminates it automatically closes flushes all the streams, release all the allocated memory and close all the opened files. But it is always a good practice that a programmer should close all the opened files before program termination.
Following is the standard syntax for close() function, which is a member of fstream, ifstream, and ofstream objects.
#d6d6d6;">void close();
Writing to a File:
While doing C++ programming, you write information to a file from your program using the stream insertion operator (ofstream or fstream object instead of the cout object.
Reading from a File:
You read information from a file into your program using the stream extraction operator (>>) just as you use that operator to input information from the keyboard. The only difference is that you use an ifstream or fstream object instead of the cin object.
Read & Write Example:
Following is the C++ program which opens a file in reading and writing mode. After writing information inputted by the user to a file named afile.dat, the program reads information from the file and outputs it onto the screen:
#d6d6d6;">#include
#include
using namespace std;

int main ()
{

   char data[100];

   // open a file in write mode.
   ofstream outfile;
   outfile.open("afile.dat");

   cout  "Writing to the file"  endl;
   cout  "Enter your name: ";
   cin.getline(data, 100);

   // write inputted data into the file.
   outfile  data  endl;

   cout  "Enter your age: ";
   cin >> data;
   cin.ignore();

   // again write inputted data into the file.
   outfile  data  endl;

   // close the opened file.
   outfile.close();

   // open a file in read mode.
   ifstream infile;
   infile.open("afile.dat");

   cout  "Reading from the file"  endl;
   infile >> data;

   // write the data at the screen.
   cout  data  endl;

   // again read the data from the file and display it.
   infile >> data;
   cout  data  endl;

   // close the opened file.
   infile.close();

   return 0;
}
When the above code is compiled and executed, it produces the following sample input and output:
#d6d6d6;">$./a.out
Writing to the file
Enter your name: Zara
Enter your age: 9
Reading from the file
Zara
9
Above examples make use of additional functions from cin object, like getline() function to read the line from outside and ignore() function to ignore the extra characters left by previous read statement.
Credits:
http://www.tutorialspoint.com/cplusplus/cpp_files_streams.htm
Continue reading ]]>Reading and writing of files in C++
Opening a File:
A file must be opened before you can read from it or write to it. Either the ofstream or fstreamobject may be used to open a file for writing and ifstream object is used to open a file for reading purpose only.
Following is the standard syntax for open() function, which is a member of fstream, ifstream, and ofstream objects.
#d6d6d6;">void open(const char *filename, ios::openmode mode);
Here, the first argument specifies the name and location of the file to be opened and the second argument of the open() member function defines the mode in which the file should be opened.
| Mode Flag | Description |
|---|---|
| ios::app | Append mode. All output to that file to be appended to the end. |
| ios::ate | Open a file for output and move the read/write control to the end of the file. |
| ios::in | Open a file for reading. |
| ios::out | Open a file for writing. |
| ios::trunc | If the file already exists, its contents will be truncated before opening the file. |
You can combine two or more of these values by ORing them together. For example if you want to open a file in write mode and want to truncate it in case it already exists, following will be the syntax:
#d6d6d6;">ofstream outfile;
outfile.open("file.dat", ios::out | ios::trunc );
Similar way, you can open a file for reading and writing purpose as follows:
#d6d6d6;">fstream  afile;
afile.open("file.dat", ios::out | ios::in );
Closing a File
When a C++ program terminates it automatically closes flushes all the streams, release all the allocated memory and close all the opened files. But it is always a good practice that a programmer should close all the opened files before program termination.
Following is the standard syntax for close() function, which is a member of fstream, ifstream, and ofstream objects.
#d6d6d6;">void close();
Writing to a File:
While doing C++ programming, you write information to a file from your program using the stream insertion operator (ofstream or fstream object instead of the cout object.
Reading from a File:
You read information from a file into your program using the stream extraction operator (>>) just as you use that operator to input information from the keyboard. The only difference is that you use an ifstream or fstream object instead of the cin object.
Read & Write Example:
Following is the C++ program which opens a file in reading and writing mode. After writing information inputted by the user to a file named afile.dat, the program reads information from the file and outputs it onto the screen:
#d6d6d6;">#include#include using namespace std; int main () { char data[100]; // open a file in write mode. ofstream outfile; outfile.open("afile.dat"); cout "Writing to the file" endl; cout "Enter your name: "; cin.getline(data, 100); // write inputted data into the file. outfile data endl; cout "Enter your age: "; cin >> data; cin.ignore(); // again write inputted data into the file. outfile data endl; // close the opened file. outfile.close(); // open a file in read mode. ifstream infile; infile.open("afile.dat"); cout "Reading from the file" endl; infile >> data; // write the data at the screen. cout data endl; // again read the data from the file and display it. infile >> data; cout data endl; // close the opened file. infile.close(); return 0; }
When the above code is compiled and executed, it produces the following sample input and output:
#d6d6d6;">$./a.out
Writing to the file
Enter your name: Zara
Enter your age: 9
Reading from the file
Zara
9
Above examples make use of additional functions from cin object, like getline() function to read the line from outside and ignore() function to ignore the extra characters left by previous read statement.
Credits:
http:/
Creation and use of matrixes in C++ (multi - dimensional arrays)
Two-Dimensional Arrays:
The simplest form of the multidimensional array is the two-dimensional array. A two-dimensional array is, in essence, a list of one-dimensional arrays. To declare a two-dimensional integer array of size x,y, you would write something as follows:
#d6d6d6;">type arrayName [ x ][ y ];
Where type can be any valid C++ data type and arrayName will be a valid C++ identifier.
A two-dimensional array can be think as a table, which will have x number of rows and y number of columns. A 2-dimensional array a, which contains three rows and four columns can be shown as below:
Thus, every element in array a is identified by an element name of the form a[ i ][ j ], where a is the name of the array, and i and j are the subscripts that uniquely identify each element in a.
Initializing Two-Dimensional Arrays:
Multidimensioned arrays may be initialized by specifying bracketed values for each row. Following is an array with 3 rows and each row have 4 columns.
#d6d6d6;">int a[3][4] = {
 {0, 1, 2, 3} ,   /*  initializers for row indexed by 0 */
 {4, 5, 6, 7} ,   /*  initializers for row indexed by 1 */
 {8, 9, 10, 11}   /*  initializers for row indexed by 2 */
};
The nested braces, which indicate the intended row, are optional. The following initialization is equivalent to previous example:
#d6d6d6;">int a[3][4] = {0,1,2,3,4,5,6,7,8,9,10,11};
Accessing Two-Dimensional Array Elements:
An element in 2-dimensional array is accessed by using the subscripts, i.e., row index and column index of the array. For example:
#d6d6d6;">int val = a[2][3];
The above statement will take 4th element from the 3rd row of the array. You can verify it in the above digram.
#d6d6d6;">#include
using namespace std;

int main ()
{
   // an array with 5 rows and 2 columns.
   int a[5][2] = { {0,0}, {1,2}, {2,4}, {3,6},{4,8}};

   // output each array element's value
   for ( int i = 0; i  5; i++ )
      for ( int j = 0; j  2; j++ )
      {
         cout  "a["  i  "]["  j  "]: ";
         cout  a[i][j] endl;
      }

   return 0;
}
When the above code is compiled and executed, it produces the following result:
#d6d6d6;">a[0][0]: 0
a[0][1]: 0
a[1][0]: 1
a[1][1]: 2
a[2][0]: 2
a[2][1]: 4
a[3][0]: 3
a[3][1]: 6
a[4][0]: 4
a[4][1]: 8
As explained above, you can have arrays with any number of dimensions, although it is likely that most of the arrays you create will be of one or two dimensions.
Credits:
http://www.tutorialspoint.com/cplusplus/cpp_multi_dimensional_arrays.htm
Continue reading ]]>Creation and use of matrixes in C++ (multi – dimensional arrays)
Two-Dimensional Arrays:
The simplest form of the multidimensional array is the two-dimensional array. A two-dimensional array is, in essence, a list of one-dimensional arrays. To declare a two-dimensional integer array of size x,y, you would write something as follows:
#d6d6d6;">type arrayName [ x ][ y ];
Where type can be any valid C++ data type and arrayName will be a valid C++ identifier.
A two-dimensional array can be think as a table, which will have x number of rows and y number of columns. A 2-dimensional array a, which contains three rows and four columns can be shown as below:

Thus, every element in array a is identified by an element name of the form a[ i ][ j ], where a is the name of the array, and i and j are the subscripts that uniquely identify each element in a.
Initializing Two-Dimensional Arrays:
Multidimensioned arrays may be initialized by specifying bracketed values for each row. Following is an array with 3 rows and each row have 4 columns.
#d6d6d6;">int a[3][4] = {
 {0, 1, 2, 3} ,   /*  initializers for row indexed by 0 */
 {4, 5, 6, 7} ,   /*  initializers for row indexed by 1 */
 {8, 9, 10, 11}   /*  initializers for row indexed by 2 */
};
The nested braces, which indicate the intended row, are optional. The following initialization is equivalent to previous example:
#d6d6d6;">int a[3][4] = {0,1,2,3,4,5,6,7,8,9,10,11};
Accessing Two-Dimensional Array Elements:
An element in 2-dimensional array is accessed by using the subscripts, i.e., row index and column index of the array. For example:
#d6d6d6;">int val = a[2][3];
The above statement will take 4th element from the 3rd row of the array. You can verify it in the above digram.
#d6d6d6;">#includeusing namespace std; int main () { // an array with 5 rows and 2 columns. int a[5][2] = { {0,0}, {1,2}, {2,4}, {3,6},{4,8}}; // output each array element's value for ( int i = 0; i 5; i++ ) for ( int j = 0; j 2; j++ ) { cout "a[" i "][" j "]: "; cout a[i][j] endl; } return 0; }
When the above code is compiled and executed, it produces the following result:
#d6d6d6;">a[0][0]: 0
a[0][1]: 0
a[1][0]: 1
a[1][1]: 2
a[2][0]: 2
a[2][1]: 4
a[3][0]: 3
a[3][1]: 6
a[4][0]: 4
a[4][1]: 8
As explained above, you can have arrays with any number of dimensions, although it is likely that most of the arrays you create will be of one or two dimensions.
Credits:
http:/
Creation and use of strings in C++
C++ provides following two types of string representations:
-
The C-style character string.
-
The string class type introduced with Standard C++.
The String Class in C++:
The standard C++ library provides a string class type that supports all the operations mentioned above, additionally much more functionality. We will study this class in C++ Standard Library but for now let us check following example:
At this point, you may not understand this example because so far we have not discussed Classes and Objects. So can have a look and proceed until you have understanding on Object Oriented Concepts.
#d6d6d6;">#include
#include

using namespace std;

int main ()
{
   string str1 = "Hello";
   string str2 = "World";
   string str3;
   int  len ;

   // copy str1 into str3
   str3 = str1;
   cout  "str3 : "  str3  endl;

   // concatenates str1 and str2
   str3 = str1 + str2;
   cout  "str1 + str2 : "  str3  endl;

   // total lenghth of str3 after concatenation
   len = str3.size();
   cout  "str3.size() :  "  len  endl;

   return 0;
}
When the above code is compiled and executed, it produces result something as follows:
#d6d6d6;">str3 : Hello
str1 + str2 : HelloWorld
str3.size() :  10
Credits:
http://www.tutorialspoint.com/cplusplus/cpp_strings.htm
Continue reading ]]>Creation and use of strings in C++
C++ provides following two types of string representations:
-
The C-style character string.
-
The string class type introduced with Standard C++.
The String Class in C++:
The standard C++ library provides a string class type that supports all the operations mentioned above, additionally much more functionality. We will study this class in C++ Standard Library but for now let us check following example:
At this point, you may not understand this example because so far we have not discussed Classes and Objects. So can have a look and proceed until you have understanding on Object Oriented Concepts.
#d6d6d6;">#include#include using namespace std; int main () { string str1 = "Hello"; string str2 = "World"; string str3; int len ; // copy str1 into str3 str3 = str1; cout "str3 : " str3 endl; // concatenates str1 and str2 str3 = str1 + str2; cout "str1 + str2 : " str3 endl; // total lenghth of str3 after concatenation len = str3.size(); cout "str3.size() : " len endl; return 0; }
When the above code is compiled and executed, it produces result something as follows:
#d6d6d6;">str3 : Hello
str1 + str2 : HelloWorld
str3.size() :  10
Credits:
]]>Creation and use of arrays in C++
C++ provides a data structure, the array, which stores a fixed-size sequential collection of elements of the same type. An array is used to store a collection of data, but it is often more useful to think of an array as a collection of variables of the same type.
Instead of declaring individual variables, such as number0, number1, ..., and number99, you declare one array variable such as numbers and use numbers[0], numbers[1], and ..., numbers[99] to represent individual variables. A specific element in an array is accessed by an index.
All arrays consist of contiguous memory locations. The lowest address corresponds to the first element and the highest address to the last element.
Declaring Arrays:
To declare an array in C++, the programmer specifies the type of the elements and the number of elements required by an array as follows:
#d6d6d6;">type arrayName [ arraySize ];
This is called a single-dimension array. The arraySize must be an integer constant greater than zero and type can be any valid C++ data type. For example, to declare a 10-element array called balance of type double, use this statement:
#d6d6d6;">double balance[10];
Initializing Arrays:
You can initialize C++ array elements either one by one or using a single statement as follows:
#d6d6d6;">double balance[5] = {1000.0, 2.0, 3.4, 17.0, 50.0};
The number of values between braces { } can not be larger than the number of elements that we declare for the array between square brackets [ ]. Following is an example to assign a single element of the array:
If you omit the size of the array, an array just big enough to hold the initialization is created. Therefore, if you write:
#d6d6d6;">double balance[] = {1000.0, 2.0, 3.4, 17.0, 50.0};
You will create exactly the same array as you did in the previous example.
#d6d6d6;">balance[4] = 50.0;
The above statement assigns element number 5th in the array a value of 50.0. Array with 4th index will be 5th, i.e., last element because all arrays have 0 as the index of their first element which is also called base index. Following is the pictorial representaion of the same array we discussed above:
Credits:
http://www.tutorialspoint.com/cplusplus/cpp_arrays.htm
http://www.cplusplus.com/doc/tutorial/arrays/
Continue reading ]]>
Creation and use of arrays in C++
C++ provides a data structure, the array, which stores a fixed-size sequential collection of elements of the same type. An array is used to store a collection of data, but it is often more useful to think of an array as a collection of variables of the same type.
Instead of declaring individual variables, such as number0, number1, …, and number99, you declare one array variable such as numbers and use numbers[0], numbers[1], and …, numbers[99] to represent individual variables. A specific element in an array is accessed by an index.
All arrays consist of contiguous memory locations. The lowest address corresponds to the first element and the highest address to the last element.
Declaring Arrays:
To declare an array in C++, the programmer specifies the type of the elements and the number of elements required by an array as follows:
#d6d6d6;">type arrayName [ arraySize ];
This is called a single-dimension array. The arraySize must be an integer constant greater than zero and type can be any valid C++ data type. For example, to declare a 10-element array called balance of type double, use this statement:
#d6d6d6;">double balance[10];
Initializing Arrays:
You can initialize C++ array elements either one by one or using a single statement as follows:
#d6d6d6;">double balance[5] = {1000.0, 2.0, 3.4, 17.0, 50.0};
The number of values between braces { } can not be larger than the number of elements that we declare for the array between square brackets [ ]. Following is an example to assign a single element of the array:
If you omit the size of the array, an array just big enough to hold the initialization is created. Therefore, if you write:
#d6d6d6;">double balance[] = {1000.0, 2.0, 3.4, 17.0, 50.0};
You will create exactly the same array as you did in the previous example.
#d6d6d6;">balance[4] = 50.0;
The above statement assigns element number 5th in the array a value of 50.0. Array with 4th index will be 5th, i.e., last element because all arrays have 0 as the index of their first element which is also called base index. Following is the pictorial representaion of the same array we discussed above:
Credits:
http:/
http:/
]]>
Use of loops with "for"
A for loop is a repetition control structure that allows you to efficiently write a loop that needs to execute a specific number of times.
Syntax:
The syntax of a for loop in C++ is:
#d6d6d6; font-size: 12px; overflow: auto; color: #313131; background-color: #eeeeee;">for ( init; condition; increment )
{
   statement(s);
}
Here is the flow of control in a for loop:
-
The init step is executed first, and only once. This step allows you to declare and initialize any loop control variables. You are not required to put a statement here, as long as a semicolon appears.
-
Next, the condition is evaluated. If it is true, the body of the loop is executed. If it is false, the body of the loop does not execute and flow of control jumps to the next statement just after the for loop.
-
After the body of the for loop executes, the flow of control jumps back up to theincrement statement. This statement allows you to update any loop control variables. This statement can be left blank, as long as a semicolon appears after the condition.
-
The condition is now evaluated again. If it is true, the loop executes and the process repeats itself (body of loop, then increment step, and then again condition). After the condition becomes false, the for loop terminates.
Flow Diagram:
Example:
#d6d6d6; font-size: 12px; overflow: auto; color: #313131; background-image: url('http://www.tutorialspoint.com/cplusplus/images/try-it.jpg') !important; background-attachment: initial !important; background-color: #eeeeee !important; background-size: initial !important; background-origin: initial !important; background-clip: initial !important; background-position: 100% 0%; background-repeat: no-repeat !important;">#include
using namespace std;

int main ()
{
   // for loop execution
   for( int a = 10; a  20; a = a + 1 )
   {
       cout  "value of a: "  a  endl;
   }

   return 0;
}
When the above code is compiled and executed, it produces the following result:
#d6d6d6; font-size: 12px; overflow: auto; color: #313131; background-color: #eeeeee;">value of a: 10
value of a: 11
value of a: 12
value of a: 13
value of a: 14
value of a: 15
value of a: 16
value of a: 17
value of a: 18
value of a: 19
Credits:
http://www.tutorialspoint.com/cplusplus/cpp_for_loop.htm
Continue reading ]]>Use of loops with “for”
A for loop is a repetition control structure that allows you to efficiently write a loop that needs to execute a specific number of times.
Syntax:
The syntax of a for loop in C++ is:
#d6d6d6; font-size: 12px; overflow: auto; color: #313131; background-color: #eeeeee;">for ( init; condition; increment )
{
   statement(s);
}
Here is the flow of control in a for loop:
-
The init step is executed first, and only once. This step allows you to declare and initialize any loop control variables. You are not required to put a statement here, as long as a semicolon appears.
-
Next, the condition is evaluated. If it is true, the body of the loop is executed. If it is false, the body of the loop does not execute and flow of control jumps to the next statement just after the for loop.
-
After the body of the for loop executes, the flow of control jumps back up to theincrement statement. This statement allows you to update any loop control variables. This statement can be left blank, as long as a semicolon appears after the condition.
-
The condition is now evaluated again. If it is true, the loop executes and the process repeats itself (body of loop, then increment step, and then again condition). After the condition becomes false, the for loop terminates.
Flow Diagram:

Example:
#d6d6d6; font-size: 12px; overflow: auto; color: #313131; background-image: url('http://www.tutorialspoint.com/cplusplus/images/try-it.jpg') !important; background-attachment: initial !important; background-color: #eeeeee !important; background-size: initial !important; background-origin: initial !important; background-clip: initial !important; background-position: 100% 0%; background-repeat: no-repeat !important;">#include
When the above code is compiled and executed, it produces the following result:
#d6d6d6; font-size: 12px; overflow: auto; color: #313131; background-color: #eeeeee;">value of a: 10
value of a: 11
value of a: 12
value of a: 13
value of a: 14
value of a: 15
value of a: 16
value of a: 17
value of a: 18
value of a: 19
Credits:
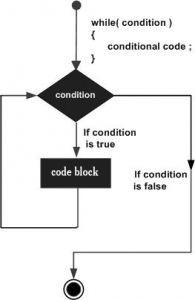
]]>Use of loops with "while"
A while loop statement repeatedly executes a target statement as long as a given condition is true.
Syntax:
The syntax of a while loop in C++ is:
#d6d6d6; font-size: 12px; overflow: auto; color: #313131; background-color: #eeeeee;">while(condition)
{
   statement(s);
}
Here, statement(s) may be a single statement or a block of statements. The condition may be any expression, and true is any non-zero value. The loop iterates while the condition is true.
When the condition becomes false, program control passes to the line immediately following the loop.
Flow Diagram:
Here, key point of the while loop is that the loop might not ever run. When the condition is tested and the result is false, the loop body will be skipped and the first statement after the while loop will be executed.
Example:
#d6d6d6; font-size: 12px; overflow: auto; color: #313131; background-image: url('http://www.tutorialspoint.com/cplusplus/images/try-it.jpg') !important; background-attachment: initial !important; background-color: #eeeeee !important; background-size: initial !important; background-origin: initial !important; background-clip: initial !important; background-position: 100% 0%; background-repeat: no-repeat !important;">#include
using namespace std;

int main ()
{
   // Local variable declaration:
   int a = 10;

   // while loop execution
   while( a  20 )
   {
       cout  "value of a: "  a  endl;
       a++;
   }

   return 0;
}
When the above code is compiled and executed, it produces the following result:
#d6d6d6; font-size: 12px; overflow: auto; color: #313131; background-color: #eeeeee;">value of a: 10
value of a: 11
value of a: 12
value of a: 13
value of a: 14
value of a: 15
value of a: 16
value of a: 17
value of a: 18
vuale of a: 19
Credits:
http://www.tutorialspoint.com/cplusplus/cpp_while_loop.htm
Continue reading ]]>Use of loops with “while”
A while loop statement repeatedly executes a target statement as long as a given condition is true.
Syntax:
The syntax of a while loop in C++ is:
#d6d6d6; font-size: 12px; overflow: auto; color: #313131; background-color: #eeeeee;">while(condition)
{
   statement(s);
}
Here, statement(s) may be a single statement or a block of statements. The condition may be any expression, and true is any non-zero value. The loop iterates while the condition is true.
When the condition becomes false, program control passes to the line immediately following the loop.
Flow Diagram:
Here, key point of the while loop is that the loop might not ever run. When the condition is tested and the result is false, the loop body will be skipped and the first statement after the while loop will be executed.
Example:
#d6d6d6; font-size: 12px; overflow: auto; color: #313131; background-image: url('http://www.tutorialspoint.com/cplusplus/images/try-it.jpg') !important; background-attachment: initial !important; background-color: #eeeeee !important; background-size: initial !important; background-origin: initial !important; background-clip: initial !important; background-position: 100% 0%; background-repeat: no-repeat !important;">#include
When the above code is compiled and executed, it produces the following result:
#d6d6d6; font-size: 12px; overflow: auto; color: #313131; background-color: #eeeeee;">value of a: 10
value of a: 11
value of a: 12
value of a: 13
value of a: 14
value of a: 15
value of a: 16
value of a: 17
value of a: 18
vuale of a: 19
Credits:
]]>Nesting of conditional statements
It is always legal to nest if-else statements, which means you can use one if or else if statement inside another if or else if statement(s).
Syntax:
The syntax for a nested if statement is as follows:
#d6d6d6; font-size: 12px; overflow: auto; color: #313131; background-color: #eeeeee;">if( boolean_expression 1)
{
   // Executes when the boolean expression 1 is true
   if(boolean_expression 2)
   {
      // Executes when the boolean expression 2 is true
   }
}
You can nest else if...else in the similar way as you have nested if statement.
Example:
#d6d6d6; font-size: 12px; overflow: auto; color: #313131; cursor: default; background-image: url('http://www.tutorialspoint.com/cplusplus/images/try-it.jpg') !important; background-attachment: initial !important; background-color: #eeeeee !important; background-size: initial !important; background-origin: initial !important; background-clip: initial !important; background-position: 100% 0%; background-repeat: no-repeat !important;">#include
using namespace std;

int main ()
{
   // local variable declaration:
   int a = 100;
   int b = 200;

   // check the boolean condition
   if( a == 100 )
   {
       // if condition is true then check the following
       if( b == 200 )
       {
          // if condition is true then print the following
          cout  "Value of a is 100 and b is 200"  endl;
       }
   }
   cout  "Exact value of a is : "  a  endl;
   cout  "Exact value of b is : "  b  endl;

   return 0;
}
When the above code is compiled and executed, it produces the following result:
#d6d6d6; font-size: 12px; overflow: auto; color: #313131; background-color: #eeeeee;">Value of a is 100 and b is 200
Exact value of a is : 100
Exact value of b is : 200
Credits:
http://www.tutorialspoint.com/cplusplus/cpp_nested_if.htm
Continue reading ]]>Nesting of conditional statements
It is always legal to nest if-else statements, which means you can use one if or else if statement inside another if or else if statement(s).
Syntax:
The syntax for a nested if statement is as follows:
#d6d6d6; font-size: 12px; overflow: auto; color: #313131; background-color: #eeeeee;">if( boolean_expression 1)
{
   // Executes when the boolean expression 1 is true
   if(boolean_expression 2)
   {
      // Executes when the boolean expression 2 is true
   }
}
You can nest else if…else in the similar way as you have nested if statement.
Example:
#d6d6d6; font-size: 12px; overflow: auto; color: #313131; cursor: default; background-image: url('http://www.tutorialspoint.com/cplusplus/images/try-it.jpg') !important; background-attachment: initial !important; background-color: #eeeeee !important; background-size: initial !important; background-origin: initial !important; background-clip: initial !important; background-position: 100% 0%; background-repeat: no-repeat !important;">#include
When the above code is compiled and executed, it produces the following result:
#d6d6d6; font-size: 12px; overflow: auto; color: #313131; background-color: #eeeeee;">Value of a is 100 and b is 200
Exact value of a is : 100
Exact value of b is : 200
Credits:
]]>Use of “switch” as a conditional
A switch statement allows a variable to be tested for equality against a list of values. Each value is called a case, and the variable being switched on is checked for each case.
Syntax:
The syntax for a switch statement in C++ is as follows:
switch(expression){
    case constant-expression  :
       statement(s);
       break; //optional
    case constant-expression  :
       statement(s);
       break; //optional

    // you can have any number of case statements.
    default : //Optional
       statement(s);
}
The following rules apply to a switch statement:
-
The expression used in a switch statement must have an integral or enumerated type, or be of a class type in which the class has a single conversion function to an integral or enumerated type.
-
You can have any number of case statements within a switch. Each case is followed by the value to be compared to and a colon.
-
The constant-expression for a case must be the same data type as the variable in the switch, and it must be a constant or a literal.
-
When the variable being switched on is equal to a case, the statements following that case will execute until a break statement is reached.
-
When a break statement is reached, the switch terminates, and the flow of control jumps to the next line following the switch statement.
-
Not every case needs to contain a break. If no break appears, the flow of control will fall throughto subsequent cases until a break is reached.
-
A switch statement can have an optional default case, which must appear at the end of the switch. The default case can be used for performing a task when none of the cases is true. No break is needed in the default case.