Quiz Week 4

--Originally published at Elu's Blog

This were my instructions:

For this quiz I want you to (in class) create a program with two functions:

  • def minimum_three(x, y, z):  # returns the value that is smallest of x, y and z
  • def sum_squares(x, y, z): # returns the value of the sum of squares of x, y, z

You implement these function in your own program in a file quiz4.py

You should make a main routine that asks the user for three numbers and then calls your functions to which should *RETURN* the value and you print in the main part of your program.

Captura de pantalla 2017-02-02 a la(s) 11.13.13.png

And this is how it runs:

Captura de pantalla 2017-02-02 a la(s) 11.14.43.png


Functions (Python3)

--Originally published at Elu's Blog

Functions in programming are like commands that you tell the computer. We already saw the int() and input() functions. For example, the input() function tells the computer to store anything that the user writes.

Creating a function

If you want to create a specific instruction for the computer, you’ll have to create a function. To do this, first you’ll have to tell the program that you’re defining a function by writing “def” before the function’s name. The next step is to write the name of the function. Then, you’ll have to tell the program if the function is going to receive any variable (that will be inside the brackets “()”), if not, don’t write anything inside the brackets. Next is to write a colon “:” to tell the function that the next things that are tabbed will be the core of the function.

Calling a function

To call a function means to merely use the name of the function and (if it is the case) write the variables needed.

Let’s look at an example:

Captura de pantalla 2017-01-31 a la(s) 15.55.33.png

In the image above we can see that the “myfunction()” function is being defined by writing “def” before it. We can also see that no variable is going to be needed in order for the function to work. The function itself only creates a variable “x” and assigns the 55 value to it, then it prints the value of “x”. After that, in line 5, that function is being called by just writing it’s name.

When you run that code, it will just simply print a number 55 on the screen. If in line 6 there was another caling for “myfunction()”, the program will instead print two number 55’s.

Another explanation

As always, if you didn’t understand my explanation or just didn’t like it, here is another

Continue reading "Functions (Python3)"

Quiz Week 3

--Originally published at Elu's Blog

This were my instructions:

For this quiz I want you to (in class) create a program with two functions:

  • def square_root(x):  // returns the square root of x (float)
  • def cube_root(x): // returns the cube root of x (float)

You should make a main routine that asks the user for a number and then calls your functions to calculate the square and cube roots of that number and prints them out.

This is my code:

Captura de pantalla 2017-01-30 a la(s) 16.18.55.png

Captura de pantalla 2017-01-30 a la(s) 16.24.28.png

In another post I’ll explain everything that went on this code.


WSQo2 – Conditionals (use of if, else and elif; and nesting of conditionals) (Python3)

--Originally published at Elu's Blog

For this assignment this were the instructions:

Write a program that will prompt the user for a temperature in Fahrenheit and then convert it to Celsius. You may recall that the formula is C = 5 ∗ (F − 32)/9. Modify the program to state whether or not water would boil at the temperature given.

And this is what I achieved:

Captura de pantalla 2017-01-30 a la(s) 14.27.27.png

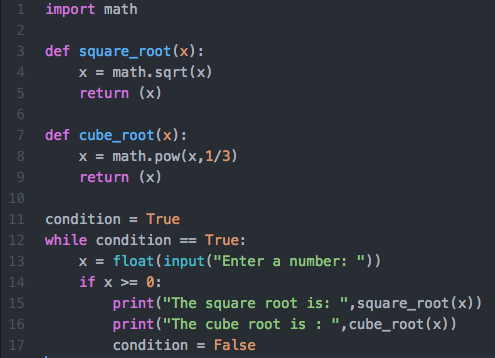
As it can be observed, there are the int() and input() functions that we already know, but I haven’t covered the if, else and elif statements. This are very easy to understand and code. When you say, “if I study, I’ll do well on my exam”, you have the conditional “if I study,” and the result “I’ll do well on my exam”. When coding, it’s really the same thing, in line 5  we can observe the conditional “if C >= 100:” (which can be read, “if C is equal or greater than 100”) and in line 6 we can observe the result ‘print(“Water boils at this temperature (under typical conditions)”)’. The “else” statement is what happens when the “if” conditional is not achieved. The “elif” works in a way that when the first conditional is not achieved, then you can have another conditional.

Also, to nest a conditional statement means to have the whole “if, elif (optional) and else” inside an “if”, an “elif” or an “else”. When you nest it it means that you write it as the “result”.

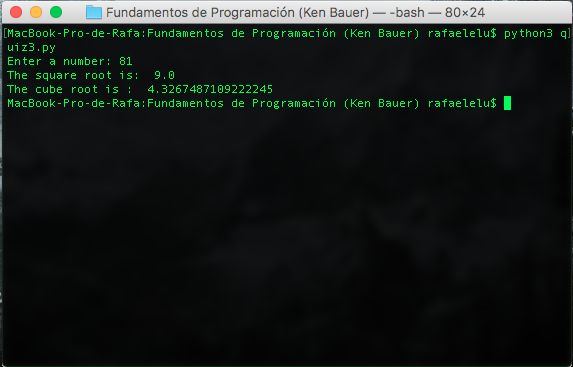
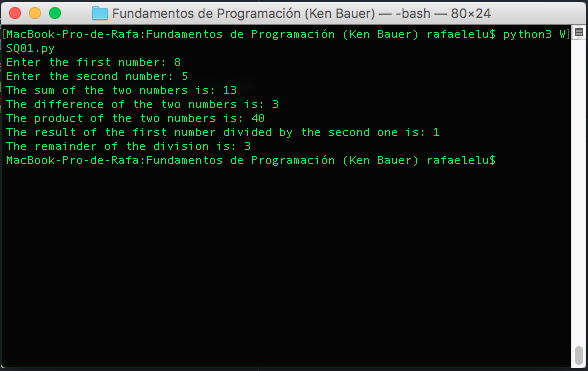
At the end, this code runs like this:

Captura de pantalla 2017-01-30 a la(s) 14.32.29.png

If my explanation wasn’t clear enough check this two links:

Python Course’s explanation

http://www.python-course.eu/python3_conditional_statements.php

The Basics – Python 3: Conditional Statements Example (RTE)

https://youtu.be/enEwTN0zeNk


WSQ01 – Basic output and user input (Python3)

--Originally published at Elu's Blog

These were the instructions that I was given for this assignment:

Ask the user for two integer values, then use those two values to calculate and show the following:

  • The sum of the two numbers.
  • The difference of the two numbers.
  • The product of the two numbers.
  • The integer based division of the two numbers (so no decimal point). First divided by second.
  • The remainder of integer division of the two numbers.

After I investigated about it, I came up with this code:

Captura de pantalla 2017-01-18 a la(s) 17.09.05.png

I’m going to explain line by line this code:

Line 1: var1 = int(input(“Enter the first number: “))

var1 is the name of the variable in this line. The equal sign means that the next thing to the right is going to be the value of the variable. The int() function converts whatever is inside it into an integer (numeric value). The input() function makes it so the user can input any value. The things inside the input() function are things that will be printed before receiving any value. So this line will first print “Enter the first number: “, then the input() function will receive a value as a string. Then the int() function will convert whatever string it received to an integer. And finally it will assign that value to the var1 variable.

Line 2:  var2 = int(input(“Enter the second number: “))

This line does exactly what the one before that but it changes what it is printed on-screen and that the variable that is being assigned a value is var2, instead of var1.

Line 3: print(“The sum of the two numbers is:”,var1 + var2)

Here we see the print() function, this function allows us to literally print on-screen whatever is between the parentheses and quotation marks (“”). For example if the code is print(“Hello world”),

Captura de pantalla 2017-01-18 a la(s) 17.39.02.png
Continue reading "WSQ01 – Basic output and user input (Python3)"

Basic types (Python3)

--Originally published at Elu's Blog

And we are not talking about snake variants, we are talking about variable types. Variables are just spaces in the memory which we give assign its value and most of the times we can change the value.

In Python3 there are 5 basic types of variables, which are: number, string, list, tuple, and dictionary.

Number: this is almost self explanatory, you can only store numbers in this kind of variable.

String: this variable stores multiple characters in order, like words.

List: this variable let’s you store multiple variables that can be of different data type. So in theory you can create lists of lists.

Tuple: this is like a list but with two key differences. The first one is that lists are enclosed in brackets “[]” and tuples are enclosed in parentheses “()”. The second and most important is that lists can be updated and tuples can’t. This means that after you store values in a tuple, you cannot change those values, only watch them.

Dictionary: this variable is unique. In a dictionary you can store a lot of values but every value needs like a key word for the program to identify. It is like a real life dictionary book, where there are a lot of words and each one of them stores more information.

Alternative Explanations

If you didn’t like my explanation on the topic or you would like another way of seeing this, you can simply check one of these two links:

Tutorials Point definitions and way of explaining

https://www.tutorialspoint.com/python/python_variable_types.htm

Carl Turland’s excellent video about it


My First Post (Setting up a Python3 environment on a Mac and Hello World)

--Originally published at Elu's Blog

http://giphy.com/gifs/hello-hi-spider-man-3o7abooVPgeGpknXpu

In this blog I’ll explain some of the basic concepts of Python3. From setting up a proper coding environment to the creation of dictionaries.

The first step – Setting up the proper environment

You have a computer, great, but you don’t know how to start coding in Python3. I personally own a Mac so I’m going to explain what I had to do to start coding in Python3. Also, when I did this I had macOS Sierra version 10.12.2.

The first thing you need is Homebrew. It lets you install Python3 very easily. To get Homebrew you only need to go to its website: http://brew.sh/index.html.

Captura de pantalla 2017-01-15 a la(s) 10.45.38.png

After that you, open up your Terminal, which has this icon: Captura de pantalla 2017-01-15 a la(s) 10.47.02.png

Then in the terminal you write “cd ” and then you copy and paste the thing that is right below the “Install Homebrew” in the Homebrew main page.

Captura de pantalla 2017-01-15 a la(s) 10.51.26.png

Then you hit enter and it will download and install Homebrew.

The next step is to install Python3. It is as easy as just typing “brew install python3” in the terminal. You click enter and there you go, you have Python3 installed in your Mac.

Captura de pantalla 2017-01-15 a la(s) 10.55.39.png

The last thing you need to start coding is an editor. Not a person, but a text editor. I recommend Atom. You can find it in its main website: https://atom.io/

Captura de pantalla 2017-01-15 a la(s) 10.58.31.png

After you download and install it, open it to start coding.

Hello World

After I opened Atom, I created a new file called “hello.py” the extension “.py” means that it is a Python program. This is my code:

Captura de pantalla 2017-01-15 a la(s) 11.04.26.png

And to run it I just had to save it, open up the Terminal, write where the file is saved (in my case, it was saved in the desktop), clicked enter,

Captura de pantalla 2017-01-15 a la(s) 11.07.27.png

and then tell to run

Captura de pantalla 2017-01-15 a la(s) 11.09.03.png
Continue reading "My First Post (Setting up a Python3 environment on a Mac and Hello World)"