Mastery 3 – Create accounts: Blog, Twitter and Github
Blog:
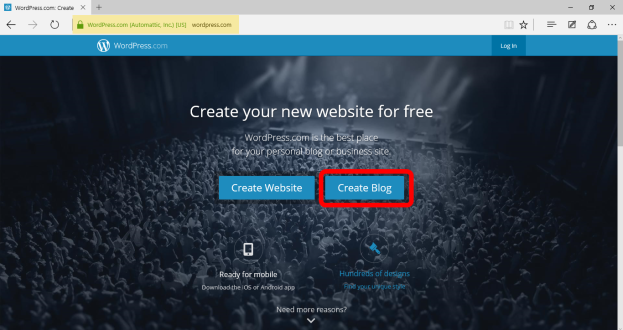
Start by going to your web browser and typing in https://www.wordpress.com, once you are in that webpage, click on the Create Blog button.
Now, select the preferred category for your blog, for example Education and School, and click on Continue.
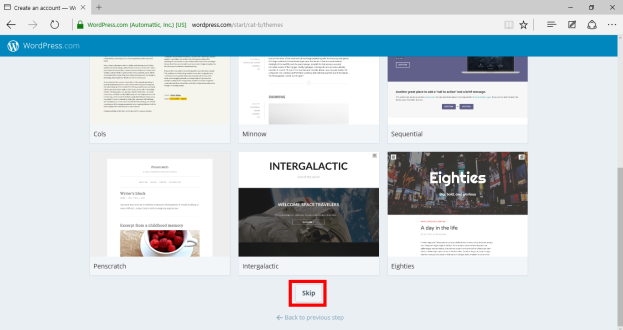
Now it will ask you to choose a theme, you can either choose a theme right away or skip this step by clicking the Skip button at the bottom of the page. Don’t worry if you don’t like the theme you choose, you can change it whenever you want.
Once you choose your theme, or skip the step, it’s time to choose a domain, the direct URL to your blog. You can either create a free domain, pay for one or if you already have one, you can map it.
Write the desired domain inside the box in the center of the page, if it isn’t available it will prompt a different option for your domain, choose whichever domain you want and click on Select.
In this step, pick the plan you want for your WordPress account, this time we will use the Free Plan.
The page will ask you for a valid e-mail adress, a valid and available username and your account’s password. Type in all three of those things and click on Create My Account. Once you’ve done that, you have to confirm you e-mail adress.
Just check the inbox of your e-mail adress for a WordPress e-mail confirmation, if it’s not there look for it on the Spam folder, if you can’t find it anywhere go to your blog and click on the Re-send your activation e-mail option.
And that’s it! Your blog is ready to be used!
Twitter:
On your web browser, go to https://www.twitter.com, in there you will see this box:
Fill the boxes with the information that is required and click on Sign up for Twitter.
Now it will ask you to choose a username, choose your username, type it in and then click on Sign Up.
Once you’ve done that, it will ask for your phone number, you can either skip that step or type your phone number. This is for security measures.
After you put in your phone number and verify it, or choose to skip that step, the page will ask for your interests and stuff you’ll like to see on Twitter, just choose whatever it is you want and keep on going through the account set up.
When you’re done with that, you’ll have to verify your e-mail adress. Just check the inbox of your e-mail adress for a Twitter e-mail confirmation, if it’s not there look for it on the Spam folder, if you can’t find it anywhere go to your account and click on the Resend confirmation button.
And that’s it! Your Twitter account is set up and ready to be used!
GitHub:
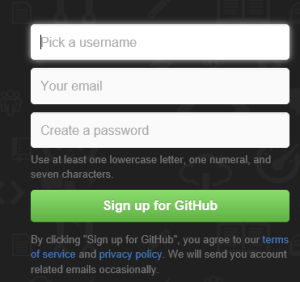
First off, go to https://www.github.com and you’ll see this:
Fill the boxes with the required information, and click on Sign up fot GitHub.
Once you’ve done that, it will ask you to choose your personal plan, this is up to you. We will use the Free option this time.
 After that, your account will be almos set up, now you have to verify your e-mail. Check the inbox of your e-mail adress for a GitHub e-mail confirmation, if it’s not there look for it on the Spam folder, follow the instructions the e-mail has, and that’s it! Your account is ready!
Mastery 4 – Submit work via Blog RSS and GitHub
To submit your work via your Blog and your GitHub account, first off you have to upload the codes you want to use to GitHub.
Go to your GitHub account and click on the  button, you’ll see this:
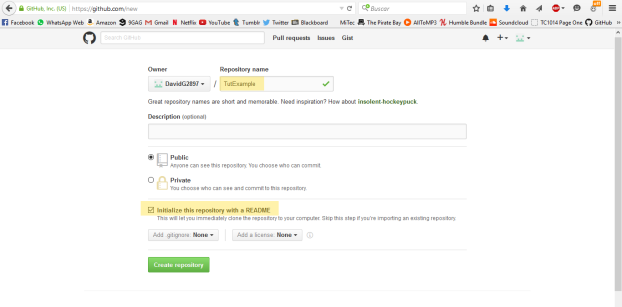
Just input the desired repository name, and check the Initialize this repository with a README box, this will make a lot easier to upload your work. Now click on Create repository.
On there, you’ll see this:
In there, click on the + you see above the content of your repository, now just copy and paste your source code from the text editor to the box in GitHub, name the file and click on the Commit new file button at the bottom of the screen. Your GitHub file has been created.
Now go to your blog, and at the top right corner you’ll see this options  click on the little pencil with a plus sign.
This will take you to a new blog entry, in there just type whatever it is you want on your blogpost (remember to add all the tags you need! like #WSQ05, or #TC101, to link all the pages you used and your source code on Git Hub) and click on the Publicar button at the bottom right corner.
And you’re done! That’s how you submit your work via Blog RSS and GitHub.
![]() Masteries 3 & 4 by davidg2897 is licensed under a Creative Commons Attribution 4.0 International License.
Masteries 3 & 4 by davidg2897 is licensed under a Creative Commons Attribution 4.0 International License.


