A condition is an operation used in programs to see if something is true or not. These conditionals help you doing ac action whenever they are true. During this post I will guide you on how to use them properly for the creation of a program:
First of all we need to understand which ones are these conditionals.
The first one is called IF. We place it in the middle of out code to see if a condition is true or false. We can only place it once, the rest of the conditions will be evaluated by a different function.
The second one is ELIF. This one can be used to evaluate many conditions along the same IF. This function can be used as many times as you want, as long as you state the word “elif” followed by the statement you want to evalute.
ELSE is the last conditional. It is use to stablish what will happen in case none of the conditions above is true.
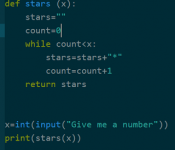
Now, we are creating a program that will evaluate a given number and show if it´s positive, negative or 0.
So we start by asking the user for a number.
How we start with our first condition; if the number is greater than zero, then it´s a positive number. So, for this we need to type if followed by the condition that would be x>0. At the end of the line we place a colon ( : ).
After this, we need the program to let the user know that the number is positive, se we create an output. This output need to be intended to show that is the action the computer should do in case the condition is true.
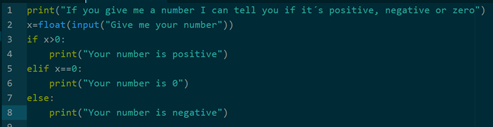
If this condition is not true, then it means that the number is zero or a negative number. To differentiate if this number is zero or negative we will need another conditional. But as we explained before, this conditional cannot be an IF conditional, but an ELIF.
An ELIF conditional works just an IF conditional: you place the word “elif” followed by the condition “x==0” and ending with a colon. Now the condition we will be evaluating is if the number is equal to zero. (It is necessary to place two equal signs to evaluate)

If none of this conditions are true, then we know that the number given by the user if not zero or greater than zero; therefore, this number is lower than zero. We know that the only numbers that are lower than zero are negative numbers.
Based on the previous reasoning, if this numbers fails to be true in both conditionals, then it is a negative number.
Now we know we don´t need to evaluate in any other condition so we can use the conditional ELSE. For this, we only write the word “else” followed by a colon. That, we just need to type the action we want the computer to do.
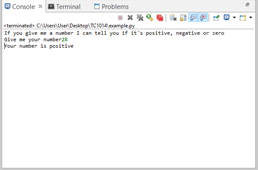
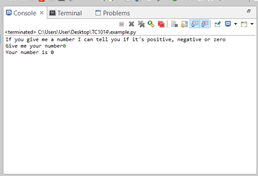
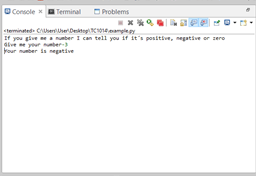
And this is what will happen when you run this program:

For opening a python file, first look for the file you want to open and make sure it is a Python File. You can prove this by seeing if it has the image of a python on it.
All the files inside the circle are considered Python File. To continue with demonstration we will open the file with the name “Hello.py”. First, give it a right click. A new menu will open and you will select the following option:
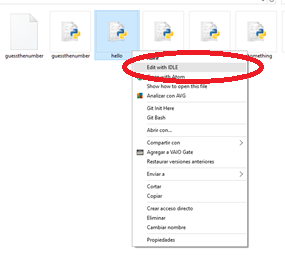
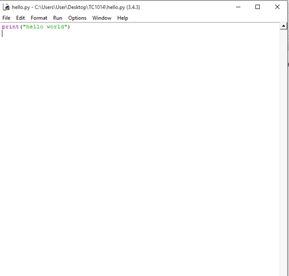
IDLE is included when you install Python so you should have it. This will help us read the file, edit it and run it whenever we want to. Once we select the option, a new window will open. In this window we can see the code and even edit if we want to.
If we want to run it we just need to press F5 of select the following option

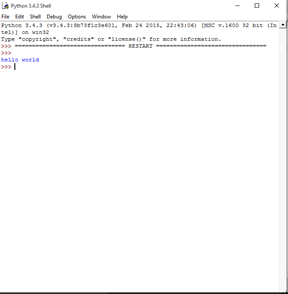
After this, Python will open a shell that is currently running your program. This way you can make sure the program you read before works just fine

A string is an extract of text used in a program. This text can be displayed as an output, but it can also be taken from the user as an input. A string is considered to be everything that is written between quotation marks. For example: “House”, “car”, “Anna”, “187.0”, “+”, “.”, etc.
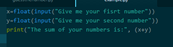
Yes, punctuation marks, numbers, and even symbols as considered to be strings if they are written between quotation marks. To explain this more efficiently, you can see the following code in which a pair of numbers are considered as strings.

This is what happens when you run it:

As you can see, the program was expected to out the sum of x plus y, not to output the text “x+y”. This happened because we typed the function between quotation marks.
When you want to get a number as an input, you need to place the word “float” or “int” before “input” so the computer knows what type of input is being taken:
X=float(input(“Give me a number”))
Y=int(input(“Give me another number”))
Just like this, we can type “str” before the word “input” but it is not necessary. Whenever you set an input without placing any word before it, the computer automatically assumes it should be considered as a string. But in case you want to type it anyway, this is how you do it:
X=str(input(“What´s your name?”))
Sometimes we need to pass our code so that someone else can see it and make some sort of improvements. Sometime we just need someone else to tell us what we are doing wrong.
Unfortunately, not all programmers program the same. Each one of the does this artwork how they believe is the best way to do it; this makes it almost impossible for someone else to understand what we are doing in each line of code.
For this, we use comments. You can add comments on a python file just by adding “#” before what you try clarify. This way, your comment do not affect the functioning of the program but it makes it clear to understand.
For example, this is the code of a program without comment. As you can see, it is hard to understand what is going on.

But once we add the comments it’s easy to understand what´s happening on every line.

Just remember, these comments DO NOT affect the code, so don´t be afraid to use them more often.
Sometimes, as a programmer, we need to consider that every user needs a program for them. However, this is not possible, but it is possible to use the same program for different users. For example we would like a program to greet everyone by their name, but not everyone’s name is the same. For this, we use variables.
Variables called this way because they can keep changing along with a program. Reviewing the example before; we would like this program to greet everyone by their name. If the value that keeps changing is the name, then the name has to become a variable. To convert the name into a variable we type it like this:
Name=
However, we cannot just type a random name after the equal sign. If we do this, the program will always greet a person in particular. For changing this, we need to state the variable as an input:
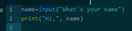
Name=input(“What´s your name?”)
When running this, the user will see the following text on their screen:
What´s your name?
After this, the user is allowed to type their respective name and the program will register it as the value of name. Therefore, when we print the variable, the user can see the text they typed:

But variables are not just text, they can also be numbers. These numbers can be float numbers or integers. Float numbers are the ones that have decimal values, and integers are the ones without decimal values.
For example, a float number will be 3.2837 and its integer will be 3.
For turning the input into a number we need to type “float” if we want it to be a float number or “int” if we wat it to be an integer between the equal sign and the “input”.
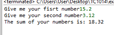
For example, this program asks for the value of 2 numbers that will be float numbers and shows you the sum of those.
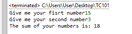
The same code can be used for integer numbers. You just need to change “float” for “int” and the result will be different:
Output is defined as what the program gives away as a result. This is a text that will be displayed in your screen during the running of your program. For printing your output on Python 3 we use:
print( )
Inside the parenthesis is where you type the text that you would like to be displayed. This can be a string, a variable, or both.
To print a string, which is an extract of text typed by the programmer, it is necessary to place it between quotation marks. Otherwise, you will receive a message saying you have a Syntax Error. In this example, the text displayed in the screen will be: Hello World!
print(“Hello World!”)
For printing a variable, you need to place the name of the variable between the parentheses without using any quotation marks. Otherwise, you will be printing text. Also, you can create some mathematical operations between the parenthesis and the output will be the result of those operations. For example, the text displayed in the screen when running this program will be: 12
X = 5
Y = 7
Print(x+y)
You can also print string variables by the same method
For printing plain text and the value of a variable. It is necessary to place the text between quotation marks. The text and the variable need to be separated by a comma. For example, the following program will print: Hi, Laura!
Name= Laura
Print(“Hi,”, name, “!”)
This other program will print: The sum of 5 + 7 equals to 12
X=5
Y=7
Print(“The sum of”, x, “+”, y, “equals to”, (x+y))

To create a blog, first you need to select where you would like to create your blog. For example: blogger or WordPress. Now I will show you how to create a blos in these websites.
BLOGGER
Your first step is to click on the following link: www.blogger.com
To create a blog in this site in necessary to get a Gmail account. If you do not have one, or you are not logged in, this is what your will see.

To continue, you need to create an account or log in if you already have one. After that, this is what you will see (sort of).

In my case, this blog shows up with the option of being edited. If this is your first time creating a blog, please select the option shown before and the following window will open automatically:

In the first line, you set a name for your blog. Try to be creative but simple (do not follow my example). On the URL you will to choose a domain that is not already taken. Do not worry if your title and your URL don´t match; they usually don´t. After setting the first two, chose a blog template. This is how your blog will look. Once you are done, select “Create Blog”.
To see how your blog looks like select the option in the green circle. To create a new post select the option on the orange circle.

WORDPRESS
To create a blog on WordPress click on the following link https://es.WordPress.com/ . This is what you will see:

Select the option: “Create Site” and you will be redirected here:

Here you choose your theme. Once you´ve chosen it, this is what you will see:
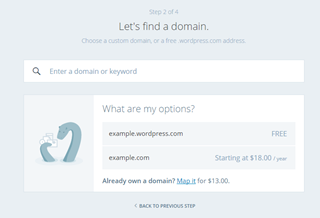
In here, you are being asked if you want a personalized domain for an extra fee, or the usual domain for WordPress users. Once you start typing, this will happen:

Once you select your domain this is what you will see:

In here, you are being asked which kind of membership you want. The first one is totally basic but it´s free. The one on the right gives you a few privileges for an extra fee, and the one in the middle gives you total access to WordPress features for another fee. Once you are done, you will be asked to create an account on WordPress and they will show you this.
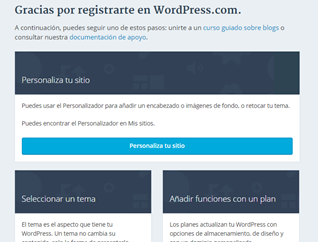
Right now, you already have your blog. You just need to personalize it.
TWITTER
You´ve probably heard about the social network “Twitter”. Here I will show you how to create an account on Twitter. First of all, click on the following link: https://twitter.com/ . This is what you will see:

Complete the table shown below. Once you are done select the option “Sign up for Twitter”
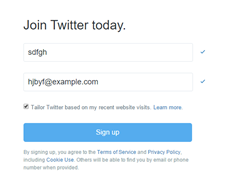
This is what you will see. On the first line you will see you name, and on the second line you will see your email address. Once you have seen the information is correct; click on “Sign up”. After that you will be asked to select you password. Make sure that this one contains special characters.
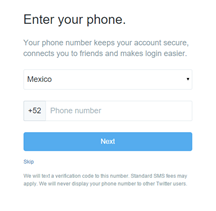
Here you can decide whether you want to enter your telephone number or not. The purpose of giving your telephone number is to receive a verification code from Twitter. Once you´ve done this, you will be asked to provide a username. This name will be displayed along with your name.
After this, all you need to do is click the option “Continue” reputedly until you see something like this:

GITHUB
GitHub is a website designed for developers so they can share their code to the rest of the world and receive suggestions about it. To create a GitHub account, enter to the following website: https://github.com/ . Complete the table and select the option “Sing up for GitHub”

This will open a new window. Once you are here, go to the bottom of the page and select Finish Sing Up”

And….That´s it
This program asks the user for a range of number and gives the sum of each one of the numbers contained in the range.
This program selects a random number between 1 and 100 and the used need to guess it. Once they guess it, the program will display the number of attempts the user had.