#WSQ08 – Functions

Foe this assignment we dug into functions.

The homework instructions were to go make to WSQ03 – Fun with numbers and write a function for each calculation.

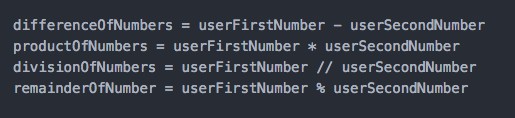
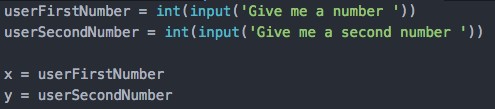
So the first thing I did was to ask the user for two numbers and set ‘x = userFirstNumber’ and ‘y = userSecondNumber’ in order to make my code look a little neater.

Screen Shot 2016-03-05 at 2.02.05 PM

Then I created the functions that will calculate the difference, product, division and remainder of the numbers.

I made a function for each of the calculations even though I could have made one function for all of them, but I decided to get a bit more practice by making more.

To create a function in Python you have to use the keyword ‘def’ followed by the name of the function and a set of parenthesis with hoe many parameters the function will accept.

Screen Shot 2016-03-05 at 2.09.47 PM

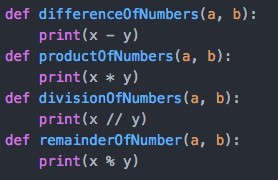
These functions accept two parameters which will be the first and second number given by the user which I passed on when I called the functions.

Screen Shot 2016-03-05 at 2.14.29 PM.png

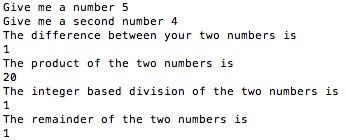
Finally I printed a string for each of the functions to let the user know which one is which, followed by the call of each function and I passed in the two parameters that each function accepts, which are the two numbers given by the user.

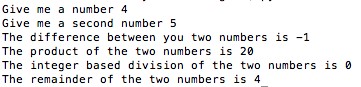
This is what the final result looks like:

Screen Shot 2016-03-05 at 2.18.17 PM


#WSQ07 – Sum of Numbers

In this problem I had to ask the user to give me to numbers and give him the sum of the range of all numbers between the two numbers given.

The first thing I did was tell the user a brief instructive on what this program will do.

The I asked for the first number, which will be the lower bound, followed by asking the second number, which will be the upper bound.

Screen Shot 2016-02-20 at 4.45.17 PM

Next I created a variable  called ‘suma’ that will hold the value of all of the sums that the the program makes until getting to the upper bound number the user gave. Also I created another variable called ‘candidate’ which will hold the value of the lower bound number for purposes of using it in the for loop.

Screen Shot 2016-02-20 at 7.24.03 PM

Then I created a for loop and set the assignment to takes the ‘candidate’ value and I used the keyword ‘range’ and set it the parameters to be the (firstNum and secondNum+1) in order for the second number to be inclusive.

Inside the loop I set the value of suma = suma + candidate

Screen Shot 2016-02-20 at 7.29.29 PM

Finally I printed a message that lets the user know the first number he chose and the last one followed by the result of the numbers in their range including both of the numbers he chose.

Screen Shot 2016-02-20 at 7.32.20 PM

This is what the program looked like:

Screen Shot 2016-02-20 at 7.32.58 PM

#WSQ06 – Pick a Number

For this task I had to do a little research first on hoe to generate a random number with python. I found out that I had to use the ‘random’ module which contains many of random number generators.

So the first thing I had to do was to import the ‘random’ module and create a new variable which will hold the random number the computer will generate.

Screen Shot 2016-02-20 at 4.06.02 PM

I used ‘random.randint(1,101)’ to generate a number from 1 – 100 and since the 100 had to be inclusive that is why I put (1,101)

The next step was to ask for the user for a number and convert it into a string, also since at the end of the program I put the total number of guesses the user tried I created a variable that will make the count for me.

Screen Shot 2016-02-20 at 4.10.18 PM

I set the variable ‘count’ to be equal to 1 because when the program prompts the ‘Guess a number….’ message that will be the users first guess.

So the next step was the create a while loop and set the assignment to be that if the userNumber is not equal to numberGenerator it would loop through the following code:

  1. First I created an if statement and set the assignment to be that if userNumber is greater than numberGenerator it should print a message to the user and let him know that the number he chose is too low
  2. Then I created another if statement but this time I set the assignment to be that if userNumber is less than numberGenerator it would print a message to the user letting him know that the number he picked is too high
  3. Then below the two if statements I put a message so that the user can try again and input another
    Screen Shot 2016-02-20 at 4.35.06 PM
    Screen Shot 2016-02-20 at 4.36.27 PM
    Screen Shot 2016-02-20 at 4.37.48 PM

    Continue reading “#WSQ06 – Pick a Number”

#WSQ05 – Temperature

For this assignment we had to ask the user first for the temperature in fahrenheit and convert it to celsius.

So first of all I had to ask the user for the temperature and store it into a variable.

Screen Shot 2016-02-20 at 3.39.18 PM

Next convert that number into what would be the temperature in celsius.

So I used the formula to convert from fahrenheit to celsius and passed in the ‘temp’ variable which holds the temperature in fahrenheit. Then converted the result into a float type number and stored it all into a new variable called ‘celsius’

Screen Shot 2016-02-20 at 3.46.28 PM

After that I output a message where it informs the user the temperature he wanted to convert and the converted temperature in celsius.

Screen Shot 2016-02-20 at 3.49.32 PM

As something extra a put an if statement that if the converted temperature is less than 100 (The temperature in which water boils in celsius) it prints out a message that says ‘Water does not boil at this temperature’ and if it greater it prints out a message saying ‘Water does boil at this temperature’

Screen Shot 2016-02-20 at 3.51.57 PM

This is what the final program does:

Screen Shot 2016-02-20 at 3.52.55 PM

#WSQ04 – Flipped Learning

Flipped learning is a new system for me, but it has really been a good and gratifying experience. It really makes learning fun.

For me personally it actually helps me remember everything that we see in class and all of the homework problems.

My routine is the following:

  1. I open the homework assignment and see what I have to do.
  2. I research whatever I don’t understand about the problem
  3. I complete the assignment

As you can see, mainly in the second step, this system makes me research a lot and this way it helps me retain all of the content.


#WSQ03 – Fun with Numbers

In this task I had some small difficulties. First of all this was the first time I actually ask the user for input in python, so I went and asked my best friend Google. After a few minutes searching the web I found out that python has a keyword called ‘input’.

The second challenge was to make sure that the user’s input was a number and not a string , so I found out that there is another keyword in python called ‘int’ and goes really well with the ‘input’ keyword. With these two keywords I discovered how to ask the user for to numbers and store them into two separate variables.

Screen Shot 2016-02-17 at 8.50.27 PM

The next step to the task was to calculate the difference between the two numbers, the multiplication, the division and the remainder. It was easy just to store the values into  different variables.

Screen Shot 2016-02-18 at 12.09.56 PM

Next was to output the result of each variable

Screen Shot 2016-02-18 at 12.14.22 PM

This was the final result

Screen Shot 2016-02-18 at 12.15.44 PM

#WSQ 02 – Hello World

INSTALLING PYTHON ON MAC

Using a Mac really made this task pretty easy. First of all I just had to install Python3 using Homebrew: which in the Homebrew page just copy and paste the command line into your terminal:

ruby -e "$(curl -fsSLhttps://raw.githubusercontent.com/Homebrew/install/master/install)"

Then in the terminal I typed in: brew install python3

THAT’S IT!

Just let Homebrew do the magic.


PRINTING ‘HELLO WORLD’

In order to print out ‘Hello World’ using Python3. First I created a folder in my desktop named “Python”, where I will keep all my ‘.py’ files.

In my text editor I created a new file in my “Python” folder and called it ‘hello.py’

Once I saved the file with the extension ‘.py’ my text editor automatically knew that it was a python file so when I typed:

print(“Hello World”)

My text editor identified the syntax and colored it.

Screen Shot 2016-01-22 at 3.14.41 PM

Now to actually print ‘Hello World’, I went back to my terminal looked for the “Python” folder and opened the ‘hello.py’ file

Screen Shot 2016-01-22 at 3.36.33 PM.png

First I had to open up my “Python” folder by using the ‘cd’ command to change the directory and follow the path to the folder which is ‘Desktop/Python’

Then use the ‘ls’ to see what is inside the “Python” folder, after that I told the terminal to use ‘python3’ to open the ‘hello.py’

And That’s It!….It printed ‘Hello World’!