Lisp: Good News, Bad News, How to Win Big

--Originally published at Hackerman's house

Lisp: Good News, Bad News, How to Win Big is an essay written by the American computer scientist Richard P. Gabriel in 1991. At that time, he worked a lot on the Lisp programming language. The main topic of the essay is the advantages and disadvantages of that programming language, and how accepted it was by the programmers, as well as some of its uses.

Lisp’s successes

Standardization

One of the biggest successes in Lisp is that there is a standard Lisp called Common Lisp. This wasn’t considered the best Lisp but it was the one ready to be standardized. There was a Common Lisp committee formed by users of different Lisps across the United States; Common Lisp was a coalescence of the Lisps these people cared about.

Performance

It used modern compiler technology of that time, so compared to older Lisps it had a very good performance. It also had multitasking and non-intrusive garbage collection, both were great features that weren’t possible before that time.

Good environments

The environments had a lot of good qualities like windowing, fancy editing and good debugging. Almost every Lisp system had these kinds of environments; a lot of attention had been paid to the software lifecycle.

Good integration

Lisp code would coexist with C, Pascal, Fortran and other languages. Lisp could invoke them and be invoked by them. This was useful to manipulate external data and foreign code.

Resultado de imagen para c language

Object-Oriented programming

At the moment it had the most powerful, comprehensive object-oriented extensions of any language. This was really important because OO was the new trend.

Lisp’s failures

The rise of worse is better

One of the biggest problems of Lisp was the tension between two opposing philosophies. The right thing and worse is better. Lisp designers used the right thing, while Unix and C

Resultado de imagen para hard to program
Continue reading "Lisp: Good News, Bad News, How to Win Big"

Code revision

--Originally published at Hackerman's house

Code review (also called peer review) is a software quality assurance activity in which one or more developers check a program by reviewing and reading parts of its source code. At least one of the reviewers must not be the code’s author, the purpose of this is to have another point of view, and different ideas to judge the code in a more objective way. The people performing the checking (except for the author of the code) are called reviewers.

Resultado de imagen para peer programming

The main objective of this process is to detect quality problems, although it can be used to reach more goals. Better code quality: improve the readability, maintainability and understandability. Finding defects: finding performance problems, security vulnerabilities among other flaws. There are many more goals that can be achieved through this process, but the general idea is to create better software and to avoid errors.

Types of review processes

Formal inspection

This is the traditional method of review. Software developers attend a series of meetings where the code is reviewed line by line. This method has been proven to be very effective in finding defects in the code.

Regular change-based code review

This is a more lightweight type of code review. This type uses something called Version Control, it is basically a system that records changes to a file or a set of files over the time. Github is one of the most popular applications that does this; the developers are constantly checking the changes made by every member of the team. They can see who is the responsible for the code and they can check it, but they do not dedicate the time to read it line by line.

Resultado de imagen para git

Source:

https://en.wikipedia.org/wiki/Code_review

OO and Agile

--Originally published at Hackerman's house

There are lot of agile methodologies, each one has its own practices and characteristics, but in general they share the same philosophy. These ideas were expressed in the Manifesto for Agile Software Development.

Resultado de imagen para agile manifesto

Individuals and interactions over processes and tools

Working software over comprehensive documentation

Customer collaboration over contract negotiation

Responding to change over following a plan

The origin of these methodologies arises in 1990s in a world shaped by two major influences: Object-Oriented programming replacing procedural programming as the programming paradigm favored by the industry; the other influence was the rise of the internet. This situation made that the requirements started to rapidly change and shorter product life-cycles were required; this was incompatible with the traditional methods of software development. There was a need for new methodologies that could adapt to this new world.

Extreme programming

Extreme programming is a methodology which is intended to improve software quality. It advocates frequent releases in short development cycles; it uses checkpoints at which new customer requirements may be added. Other main elements of this methodology is pair programming, extensive code review, unit testing of all the code, avoiding to develop features until they are actually needed, and one of the most important ones is constant communication between the client and the programmers to assure all the requirements are being fulfilled. The origin of the name is that traditional software engineering practices are taken to extreme levels, such as pair programming that is basically extreme code review.

Resultado de imagen para extreme programming

Sources:

https://en.wikipedia.org/wiki/Extreme_programming

http://agilemanifesto.org/

Test Driven Development

--Originally published at Hackerman's house

Test Driven Development is a software development process that repeats very short development cycles, the requirements are turned into specific test cases, and the software is improved in order to pass these new tests. This way all the software is proven to meet the requirements set. One of the main responsibles for this methodology is Kent Beck who rediscovered the technique.

A Test Driven Development cycle consists of a series of steps. According to the book Test-Driven Development by Example these are the steps.

Add a test

Each new feature begins writing a test. The test defines a function or the improvement of an existing function. The developer must start by fully understanding the feature and its requirements. Some of the tests can be updates of an existing test. The use of tests before starting to write code lets the developer to focus on the requirements while writing code.

Run all tests and see if the new test fails

In this step the existing code is proven to see if the new test is passed. If the existing code passes the new test it means that the test is useless or flawed. The new test should always fail because there should not be code that fulfills the requirements yet.

Resultado de imagen para tests

Write the code

The next step is to write the code to pass the test. It is not that important that the code is elegant or really well written. The most important thing is to pass the test. One thing you should consider is that the code must only fulfill the test and not add more functionality beyond that.

Run tests

If all test cases now pass, then the new code meets the test requirements and doesn’t break any existing features.

Refactor code

The last step in the cycle is to

Resultado de imagen para code
Continue reading "Test Driven Development"

Verification and validation

--Originally published at Hackerman's house

These are two different processes utilized to test if the software we are producing satisfies certain characteristics. Both are directly related with what the client wants to build. Let’s see the differences between them and why both or them are important in the process of building great software.

Verification

Verification is the process of evaluating work-products of a development phase, this doesn’t evaluate the final product. The evaluation done decides if the software satisfies the specified requirements of that phase.

Are we building the product right?

Verification is done trough reviews, walkthroughs and inspections. These check if the software satisfies each of the requirements it should.

Resultado de imagen para verify

Validation

Validation is the process of evaluating software at the end of the development process to determine if it satisfies specified business requirements. It basically evaluates if the software does what the client needs, it is directly related to the specifications done at the beginning of the project, if these were wrong in the first place then the software won’t be validated.

Are we building the right product?

There are two ways to perform software validation, internal and external. In the internal way it is assumed that the goals of the stakeholders were correctly understood, and if the software meets the requirement specification then it is internally validated. External validation happens when you ask the stakeholders if the software meets their needs.

Resultado de imagen para validation

Source

http://softwaretestingfundamentals.com/verification-vs-validation/

Chapter 10 HFOOAD

--Originally published at Hackerman's house

I have finally finished this book about software analysis and design. The last chapter was like a big recapitulation of all the other chapters in the book, its purpose is to explain how everything is connected and part of the same process; a process that can be used over and over to develop great software.

First you have to figure out what the app is supposed to do, to get this part right it is necessary a lot of communication between the developers and the client. A good way of writing down these features is as a list, at this stage you must understand each of the features and make sure that you have all of the key features the client wants.

When you have all your features you can start working on the use cases. Use cases reflect how the system is used. It consists of many steps on how the action is done; it includes subjects and verbs as well.

Once you have all your use cases you can start working into smaller pieces of functionality. Modularity is really important in this step. Take your time defining how to break up the system. When you are breaking up the system you should consider that each thing has to have a single responsibility, make sure your classes use this principle in order to have a better design.

Gears

Photo by David Douša

When the big picture is defined, it’s time to dig deeper in specific parts of the system. Understand the part of the system you are working on and do use cases for that. The general understanding of the system lets you work on the specific parts of it.

Domain analysis consists in determining the operations and the classes that are going to be in the system. It is

Coding
Continue reading "Chapter 10 HFOOAD"

Classes to code

--Originally published at Hackerman's house

If you have read my blog up until now, you should know the basics about software design, and specifically about the use of UML in this area. Let’s see how to take advantage of all the analysis and design we have done. The class design that we already know how to do can be converted into code that will be the actual implementation of the system.

Resultado de imagen para class diagram

The quality of the diagrams used has a direct implication on how to translate it into code. Diagram classes are object oriented, so it may be convenient for you to convert these diagrams into a object oriented language; this will allow you to keep the identity and functionality of the system you design; if you consider that using a non-object oriented language is more appropriate in your own case feel free to do so.

It is important for you to have a profound understanding of your system and your diagrams before starting to code. You will be able to see that the class diagrams offer you a lot of information to that you can take advantage of; the first example is the attributes you will need to initialize in your code. The method’s name gives you a basic understanding of what you have to program. Even the inheritance is specified within the diagrams, all you have to do is implement all the design you already have. Just take your time and select a language you are familiarized with.

Resultado de imagen para coding

As we can see, the hard part is already done when the analysis and design is finished. The implementation is just a translation of what we already know about the system.

Chapter 8 HFOOAD

--Originally published at Hackerman's house

Design principles

This chapter talks about a topic I already discussed a little in one of my posts. Design principles, which are guides that can be used to solve common problems when you are programming and allow you to do better code and without having that many troubles.

Imitation is the sincerest form of not being stupid

A design principle is a basic tool or technique that can be applied to writing code, the principal function of these principles is to make the code more maintainable, flexible or extensible.

The first one that is exposed it is really simple, it is called Open-Closed Principle, the basic idea is that the code should be extensible but not modified. A basic example of this is when you inherit from a class and you override an existing method. The behavior in the original class that is already proven won’t be affected, but it is useful for other similar implementations.
locked

Image by Montillon.a

The Don’t Repeat Yourself Principle has to do with reutilization of code, when you are coding you have to abstract out things that are common and placing those things in a single location. First you need to detect the repeated code and determine which is the best place or class for that specific code. Then you erase the repeated code and just reference the code from the appropriate place. This is directly related to the requirements list, you want to implement each feature just once in the system.

repeat

Photo by Corliss NG

The Single Responsibility Principle. Every object in your system should have only one responsibility. You must analyze the methods inside a class to determine that they belong in there, that they are the responsibility of that specific object. If this isn’t the case, you need to move these

Resultado de imagen para single task
Continue reading "Chapter 8 HFOOAD"

Classes to tables

--Originally published at Hackerman's house

When you have to map objects to relational databases, the place where you have to start is with the data attributes of the class. It is important to define in how many columns these attributes will be mapped, it can be from zero columns to many more. Not all attributes are persistent, this means that they are used for some temporal calculation in the application, this has a direct impact in the way the database is designed because it’s possible that this attribute is not necessary in your database. In the case that an attribute is an object in their own, the attribute will map into several columns in the database.

The easiest mapping is when each attribute goes into a single column. In this case the class model and the physical data model can be very similar; the main differences will be that the data model needs at least one primary key, and in case there are more classes interrelated you need to add the foreign keys for the occasion.

Inheritance

Inheritance is a big deal when mapping a class into a table. The issue is figuring out how to organize the inherited attributes in your model. There are three fundamental solutions for this.

This class hierarchy will be modified using the three approaches.

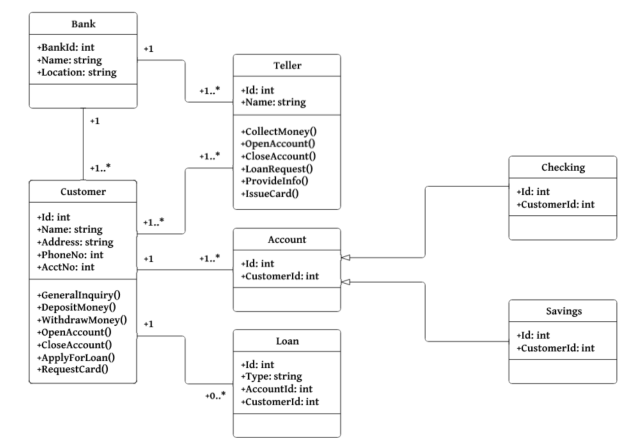
Figure 1. A UML class diagram of a simple class hierarchy

Using one data entity for an entire class hierarchy.

This means that you will map an entire class hierarchy into just one data entity that contains all the attributes of all the class in the hierarchy. It is important to add the primary key to the data entity. The advantage of this approach is that you have all the information available in just one table; this supports polymorphism in an easy way. The cons are that has a high level of coupling and an error

Figure 2. Mapping the class hierarchy to one single data entity.
Figure 3. Mapping each concrete class to a single data entity.
Figure 4. Mapping each class to its own data entity.
Continue reading "Classes to tables"

HFOOAD Chapter 7

--Originally published at Hackerman's house

This chapter is about how sometimes you don’t know where to start a project or how to approach it. This is something that made I felt identified to; it is usual that at the beginning of a project I spend more time looking at the screen and thinking without any idea of how to start, so I think it was useful to read this chapter.

The things in your application that are really important are architecturally significant, and you should focus on them FIRST.

One of the first advices I found useful was that before you start designing the relations between the parts of the systems you need to have these parts or at least the basics. Architecture isn’t just about the relationships; it’s is also about deciding which parts are more important to create them first. This is where the three Q’s of architecture get into the scene; they help you determine which modules are more important.
Q

Photo by Bill Dickinson

Is it part of the essence of the system?

The essence is the most basic idea of what a system does. The easiest way to determine if a part is essential to the system is imagining the system withouth that feature, if you can’t, the feature is most probably essential.

What the heck does it mean?

This idea was somewhat new to me, because I usually start with the part that I can understand easily. In this case the suggestion is start with the features we don’t completely understand. This allows you to avoid risks around this feature. Understanding it from the beginning can mean that you won’t have problems when you are designing the relation with other parts.

Confused

Photo by Thomas Hawk

How the heck do I do it?

This idea is really similar to the one Continue reading "HFOOAD Chapter 7"